 Linux Containers now with VMs |
I have been running Linux Containers (LXD) for several years now, and I have found them really useful. The key advantages of Linux Containers are:
- Running full Linux OS inside a container, which makes troubleshooting much easier (than Docker)
- Cloud-like experience. Cloud computing has taken off, not just because it is someone else’s computer, but because it has made spinning up a server easy. Linux Containers provides a similar easy experience in adding a server. Some of the capabilities are: snapshots of containers, transferring containers from one host to another, quick creation and removal of containers.
- Secure and scalable. Linux containers run by default, as unprivilaged thereby protecting the host system. And because Linux Containers are light weight, I have been able to scale up webserver containers to over 30 running on a Raspberry Pi 3B+.
- Excellent IPv6 Support. Containers have persistent MAC addresses, and therefore will request the same IPv4 address, and form the same SLAAC addresses after every reboot, regardless of container boot order (unlike Docker).
Connecting your Container to the Internet
As an old networking guy, in the past I have taken a network approach to getting my containers connected to the internet. I would configure a linux bridge (the front bridge) on the host, and then connect the Containers and the Host to that bridge. Like this:
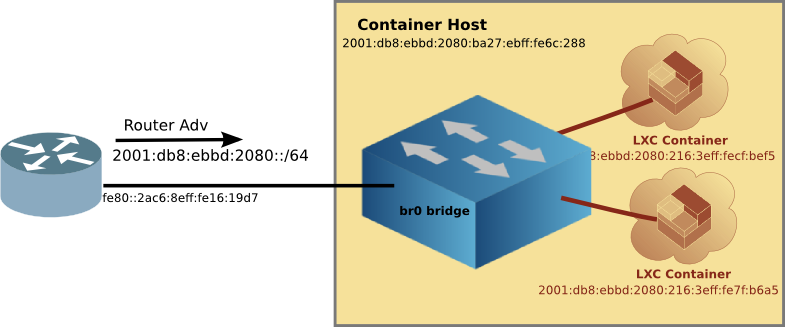
This method works quite well, allowing your router to provide addresses to your containers, and thus Internet connectivity. However, it is tricky to setup, and there is a risk of cutting off network access to the host when moving the host connection from the ethernet port to the Linux Bridge.
Using MACVLAN interface
There is an easier way, which doesn’t require the setting up of the front bridge or moving the host network connection. It is using the MACVLAN network attachment.
The MACVLAN technique uses the features of modern network interfaces (NICs) that support virtual interfaces. With virtual interface support, a single NIC can support not only multiple IP addresses, but several MAC (Media Access Control) addresses as well.
[Network Diagram with MACVLAN] 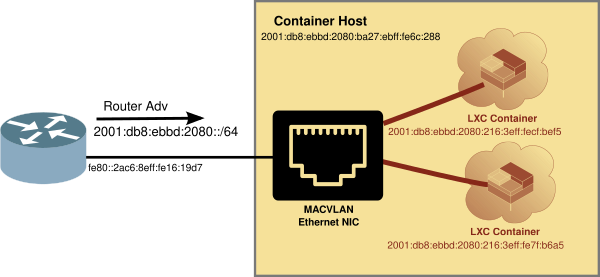
Creating LXD Profile for MACVLAN
LXD Containers use a profile to determine which resources to attach to, such as hard disk or network. The default LXD proflie looks like:
$ lxc profile show default
config: {}
description: Default LXD profile
devices:
  eth0:
    name: eth0
    network: lxdbr0
    type: nic
  root:
    path: /
    pool: default
    type: disk
name: default
used_by: []
In the eth0 section, you can see that by default, the container will attach to the LXD linux bridge it sets up at init time, called lxdbr0. Unfortunately, that is a bridge to no where.
So we’ll create another profile that connects to the Host NIC via MACVLAN. First copy the default, and then change a couple of lines, specifically the nictype and the parent. The parent is the name of the host ethernet device. On a Raspberry Pi running Pi OS, it is eth0.
$ lxc profile copy default macvlan
$ lxc profile show macvlan
config: {}
description: Default LXD profile
devices:
  eth0:
    nictype: macvlan
    parent: eth0
    type: nic
  root:
    path: /
    pool: default
    type: disk
name: enet
used_by: []
Using the MACVLAN profile
Now that you have a MACVLAN profile, using it is as simple as launching a new container with the -p macvlan option. For example, firing up a Container running Alpine OS:
$ lxc launch -p macvlan images:alpine/3.16 test
Creating test
Starting test
$
Looking at the container running with the lxc ls command:
$ lxc ls
+---------+---------+------------------------+-----------------------------------------------+-----------+-----------+
|  NAME   |  STATE  |          IPV4          |                     IPV6                      |   TYPE    | SNAPSHOTS |
+---------+---------+------------------------+-----------------------------------------------+-----------+-----------+
| test    | RUNNING | 192.168.215.129 (eth0) | fd73:c73c:444:0:216:3eff:fe65:2b99 (eth0)     | CONTAINER | 0         |
|         |         |                        | 2001:db8:8011:fd44:216:3eff:fe65:2b99 (eth0)  |           |           |
+---------+---------+------------------------+-----------------------------------------------+-----------+-----------+
And you can see that the new container already had IPv4 and IPv6 addresses (from my router). Let’s try a ping from inside the container.
Checking connectivity from inside the MACVLAN attached Container
We’ll step inside the container with the lxc exec command, and ping via IPv6 and IPv4.
$ lxc exec test sh

~ # ping -c 3 he.net
PING he.net (2001:470:0:503::2): 56 data bytes
64 bytes from 2001:470:0:503::2: seq=0 ttl=56 time=34.192 ms
64 bytes from 2001:470:0:503::2: seq=1 ttl=56 time=33.554 ms
64 bytes from 2001:470:0:503::2: seq=2 ttl=56 time=33.959 ms

--- he.net ping statistics ---
3 packets transmitted, 3 packets received, 0% packet loss
round-trip min/avg/max = 33.554/33.901/34.192 ms

~ # ping -c 3 1.1.1.1
PING 1.1.1.1 (1.1.1.1): 56 data bytes
64 bytes from 1.1.1.1: seq=0 ttl=59 time=11.835 ms
64 bytes from 1.1.1.1: seq=1 ttl=59 time=11.933 ms
64 bytes from 1.1.1.1: seq=2 ttl=59 time=11.888 ms

--- 1.1.1.1 ping statistics ---
3 packets transmitted, 3 packets received, 0% packet loss
round-trip min/avg/max = 11.835/11.885/11.933 ms
~ #
As you can see we can get out to the internet without all the fuss of the old way of setting up a front bridge.
Is there a downside to using MACVLAN?
With it being so easy to connect to your LAN using MACVLAN, are there any downsides?
A key limitation of using MACVLAN is that one must use an Ethernet NIC. Or to put it another way, you can’t use Wifi when using a MACVLAN interface. This is because the MACVLAN interface is a virtual interface, and creates additional MAC addresses for each container.
In a managed Wifi network (which 99% are), the Access Point (AP) will only talk to the MAC address of the client which registered with the AP. A MACVLAN will try to use additional MAC addresses which will be rejected by the AP (since those addresses are not registered with the AP.
That doesn’t mean that you couldn’t try to set up a Wireless Bridge with Wireless Distribution System (WDS), but that is beyond the scope of this article. For now, think of MACVLAN as only using your Ethernet NIC.
OK, but can the Container talk to the LXD Host?
The short answer is NO. But there is a work-around. Because the Containers are talking on a virtual interface of the NIC, and the host is on the physical interface, it doesn’t see the traffic. However, if one adds an additional MACLAN interface on the Host, the Container will be able to communicate with the Host.
Fortunately, there is a script to automagically create a MACVLAN interface on the LXD Host. This script is called: lxd_add_macvlan_host.sh.
The script does not make any permanent changes to the host, but rather configures the MACVLAN interface on the fly. If you want this to be permanent, then invoke the script from /etc/rc.local (you may have to enable rc.local if you are using systemd).
Using LXD without installing it first
Fortunately, if you want to learn about Linux Containers before doing an actual install, Ubuntu has setup a cloud service, where you can try LXD online. The session is limited to 30 minutes, but it is free.
You can try LXD using the Ubuntu Cloud service.
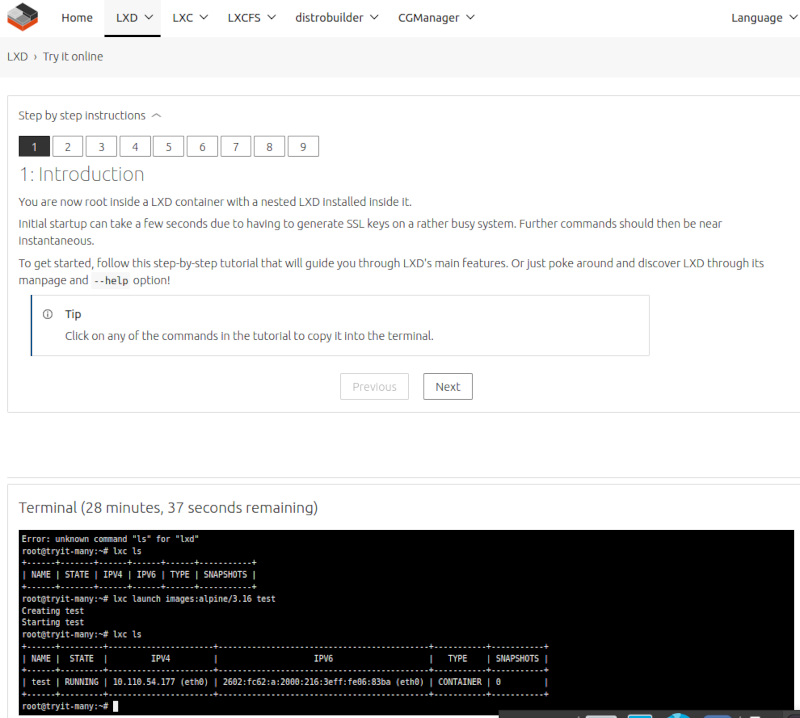
The linux containers have real-routable IPv6 addresses, which can be accessed from the internet.
$ ping 2602:fc62:a:2000:216:3eff:fe06:83ba -c3
PING 2602:fc62:a:2000:216:3eff:fe06:83ba(2602:fc62:a:2000:216:3eff:fe06:83ba) 56 data bytes
64 bytes from 2602:fc62:a:2000:216:3eff:fe06:83ba: icmp_seq=1 ttl=50 time=73.8 ms
64 bytes from 2602:fc62:a:2000:216:3eff:fe06:83ba: icmp_seq=2 ttl=50 time=70.8 ms
64 bytes from 2602:fc62:a:2000:216:3eff:fe06:83ba: icmp_seq=3 ttl=50 time=70.8 ms

--- 2602:fc62:a:2000:216:3eff:fe06:83ba ping statistics ---
3 packets transmitted, 3 received, 0% packet loss, time 2004ms
rtt min/avg/max/mdev = 70.764/71.777/73.790/1.423 ms
It is designed to allow you to get familiar with LXD, but you can actually run services (for 30 minutes) such as a web server or even manage LXD using LXDware over IPv6!
Using LXD on a Pi
Of course, LXD runs on more powerful machines than just Raspberry Pi’s. But you can enjoy the advantages of Linux Containers in your own home by installing it on a Pi. Using MACVLAN interfaces means it just got simpler to install and use Linux Containers.