
|
Wireless Mesh is the buzzword for the 2020s. In the effort to have wall-to-wall Wifi coverage, SOHO (Small Office/Home Office) router vendors, have carved out a new, more expensive, market niche. If one router is good, then three routers must be better (and more profitable).
In this article, we’ll delve into the technology of IPv6-only Wireless Mesh, the benefits, and downsides if using a Wireless Mesh, instead of the common traditional single SOHO Wireless Router.
What is Wireless Mesh
Wireless Mesh is a group of routers acting together to provide broader wireless coverage, while creating a non-looping paths through the network. The IEEE (The Institute of Electrical and Electronics Engineers) which brought you Ethernet (802.3) and Wifi (802.11), created an ammendment to the Wifi Standard for wireless mesh called 802.11s in 2012.
There are many commercial offerrings for Wireless Mesh network on the market today. Many extend, or implement proprietary aspects of of mesh networking, which creates vendor lock-in.
Fortunately, OpenWrt, the open-source router software, implements the 802.11s standard, and it is possible to create a multi-node wireless mesh with a variety of router vendor’s products.
Wireless Mesh using OpenWrt & 802.11s
Below is a diagram of a simple 3 node wireless mesh network. The Mesh Portal connects the wireless mesh network to the wired network. The left-most router acts as a Layer 3 (network layer) boundary for the mesh network, providing RA (Router Advertisements), and NAT64/DNS64 services.
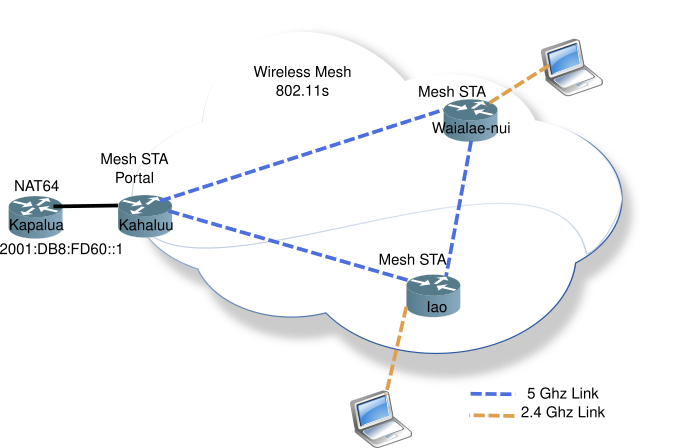
The wireless mesh network is a single L2 domain, all attached devices will be in the same subnet (or IPv6 prefix).
In this mesh network, all nodes are on the same 5 Ghz channel, while the 2.4 Ghz access APs can be on different channels, but share the same SSID to allow wireless devices to easily roam from one mesh node to the next.
Two of the nodes, Waialae-nui and Iao, also server as regular Access Points (AP) allowing wireless nodes to connect to the mesh network.
Looking at 802.11s loop prevention
In order to prevent looping in mesh networks, 802.11s uses Path Discovery using Path Requests (PREQ) and Path Reply (PREP) messages.
Node A looking for a path to Node H. It will flood PREQ messages to all nodes using the ethernet broadcast MAC address. Node H will receive the PREQ message from Nodes F & J, but F will have a lower hop-count, thus the path back to Node A will be via Node F. Node H will send the PREP message back to Node A via the F-D-A path, which Node A will record, noting that the best path from A to H is along the path of A-D-F-H. The use of PREQ and PREP messages remove the possibility of looping in a Mesh network.

PCAP of PREQ & PREP messages
Mesh Networking Addressing, the Air Bridge
A mesh network can be thought of as a giant distributed ethernet bridge forwarding ethernet frames from wired and wireless interfaces across the 802.11s mesh network. In order to transport entire ethernet frames (and their IP payloads) across the wireless mesh, an additional mesh control header is appended after 802.11 header. The Mesh Control Header contain the additional MAC address fields of original source and destination.
In the diagram below, you can see the original sender STA 1 and destination, STA 7 are preserved in Mesh Control Header (as addr 5 & 6) as the packet traverses the mesh network.

PCAP of the Six Addresses used to create the Air Bridge
Determining if your OpenWrt router supports 802.11s
The OpenWrt router must be running version 19.07.x, as wireless mesh is not supported in earlier releases.
802.11s wireless mesh must be supported at the hardware level. In order to determine if your OpenWrt router has this support run the following command:
# iw list | grep mesh
         * mesh point
         * #{ managed } <= 2048, #{ AP, mesh point } <= 8, #{ P2P-client, P2P-GO } <= 1, #{ IBSS } <= 1,
         * mesh point
         * #{ managed } <= 2048, #{ AP, mesh point } <= 8, #{ P2P-client, P2P-GO } <= 1, #{ IBSS } <= 1,
In the above example of dual band router, the * mesh point indicates that it does support 802.11s mesh. The { AP, mesh point } indicates that mesh and AP functionality are simultaneously supported on the same radio.
Configuring OpenWrt for 802.11s Mesh
In order to configure wireless mesh, where all nodes run on the same channel, it is good to scout the area you wish to cover with the wireless mesh network to determine a relatively empty channel. 5 Ghz is the better choice as it has more available non-overlapping channels (9 20 Mhz channels, vs 3 20 Mhz channels on 2.4 Ghz). You may choose to use 40 Mhz channels on the 5 Ghz band, but that reduces the available channels to four. There are the DFS channels (16 20 Mhz, or 8 40 Mhz), but they are not recommended for Wireless Mesh, as nodes will become unavailable, as they move out of the DFS band.

Once you have selected a single channel to be used by your mesh, the following must be done for each of the mesh nodes in your network.
- Install a
wpadwhich supports mesh - Add
/etc/config/wirelesswith a mesh interface - And configure mesh channel in
/etc/config/wireless - Run the
wificommand to reload the wireless config
Before configuring the OpenWrt router for 802.11s, one must remove the default wpad (WPA daemon) and install one that supports mesh networking. Ensure you do this while attached to the router via a wired connection, as you are likely to lose your wireless connection.
opkg remove wpad-mini
opkg remove wpad-basic
opkg install wpad-mesh-openssl
Then add this stanza to the /etc/config/wireless file:
config wifi-iface 'mesh'
        option network 'mesh lan'
        option device 'radio0'
        option mode 'mesh'
        option mesh_id 'mymesh' # anything, this connects the nodes into one mesh (plus the password if there's any)
        option encryption 'psk2/aes' # or 'none'
        option key 'mysecret'
Change mymesh and mysecret to match your naming and password needs. They must be the same for all mesh nodes
And change the channel of the 5 Ghz Radio to your mesh channel in /etc/config/wireless
config wifi-device 'radio1'
        option type 'mac80211'
        option hwmode '11a'  # indicates the 5Ghz radio
        option path 'pci0000:00/0000:00:00.0'
        option channel '44'  # the Channel to be used for Mesh Network
        option htmode 'HT20'
Run the wifi command to cause OpenWrt to reload the wireless configuration.
Clearly, you will need to run through these steps for each node in your wireless mesh.
Managing the Mesh Nodes
802.11s only provides Layer 2 connectivity between the nodes. In order to be able to manage the nodes the router must be put into dumb AP mode, and assigned a static IP address
In order to not lose connectivity while configuring the router, assign a static IP address to the the LAN interface. Since this is to be an IPv6-only network, assign a static IPv6 address in the same prefix as your IPv6-only network.
Edit the /etc/config/network file, adding ip6gw and ip6addr to the LAN interface. Normally IPv6 gateway addresses are link-local addresses, but that requires interface scope. In this case, it is easier to point back to the NAT64 router’s Global Address (GUA) on LAN interface as the gateway.
For an IPv6-only network, it is OK to leave the IPv4 static address, as it won’t be used, and maybe helpful, to recover the node on your workbench.
config interface 'lan'
        option type 'bridge'
        option ifname 'eth0.1'
        option proto 'static'
        list ipaddr '192.168.222.1/24'
        option ip6gw '2001:db8:8011:fd60::1'
        list ip6addr '2001:db8:8011:fd60::3/64'
To place the router into dumb AP mode, one must disable the DHCPv4 server, and disable IPv6 RA and DHCPv6 services.
Edit /etc/config/dhcp file to disable DHCPv4, and comment out the following lines for RA and DHCPv6 servers on the LAN interface.
config dhcp 'lan'
        option interface 'lan'
        option ignore '1'
        # option ra_management '1'
        # option ra 'server'
        # option dhcpv6 'server'
Ensure that you are connected to the router via the static IPv6 address (it is a good time to put that address in your local DNS server), and restart networking on the router for the changes to take effect.
/etc/init.d/networking restart
Admiring your 802.11s mesh network
In the default OpenWrt configuration, the LAN ports, and the Wireless Radios (2.4 & 5 Ghz) are bridge together. This means by default, the wireless mesh will be bridged to the LAN ports of each router, making it easy to manage by plugging into any LAN port with your laptop.
Since you have already assigned DNS names to the static IPv6 addresses of each node, it is easy to ssh to a node and see if your mesh network is up and running. In this example I’ll ssh to the mesh portal node kahaluu.
$ ssh root@6kahaluu-ap
BusyBox v1.30.1 () built-in shell (ash)

  _______                     ________        __
 |       |.-----.-----.-----.|  |  |  |.----.|  |_
 |   -   ||  _  |  -__|     ||  |  |  ||   _||   _|
 |_______||   __|_____|__|__||________||__|  |____|
          |__| W I R E L E S S   F R E E D O M
 -----------------------------------------------------
 OpenWrt 19.07.4, r11208-ce6496d796
 -----------------------------------------------------
root@Kahaluu:~#
The iw command will display that status of paths as well as of each peer. The Paths command is a shorter output. Make sure you use the correct wireless interface (wlan0 or wlan1).
root@Kahaluu:~# iw dev wlan0 mpath dump
DEST ADDR         NEXT HOP          IFACE   SN  METRIC  QLEN    EXPTIME     DTIM    DRET    FLAGS
c4:e9:84:2f:4d:de c4:e9:84:2f:4d:de wlan0   69838   326 0   0   100 0   0x4
84:c9:b2:54:30:5c 84:c9:b2:54:30:5c wlan0   0   299 0   0   0   0   0x10
Since this is Layer 2-based, you will only see MAC addresses of each node. It is probably a good time to make a note of each nodes MAC address. The key fields of this output are the Destination Address, Next Hope, and Metric columns. Because this is only a 3 node mesh, the Destination Address and Next Hop will almost always be the same. To see the mesh in action, run the wifi command on another node, while running the MPath on the original node, not that initially, the connectivity will be via the third node, before reverting to a direct connection.
Watching a mesh node reattach
root@Iao:/etc/config# iw dev wlan1 mpath dump
DEST ADDR         NEXT HOP          IFACE   SN  METRIC  QLEN    EXPTIME     DTIM    DRET    FLAGS
84:16:f9:eb:c9:ae 84:c9:b2:54:30:5c wlan1    6   556 0   1260    100 0   0x5
84:c9:b2:54:30:5c 84:c9:b2:54:30:5c wlan1   27943   257 0   1270    100 0   0x15
root@Iao:/etc/config# iw dev wlan1 mpath dump DEST ADDR NEXT HOP IFACE SN METRIC QLEN EXPTIME DTIM DRET FLAGS 84:16:f9:eb:c9:ae 84:16:f9:eb:c9:ae wlan1 9 326 0 3460 200 1 0x5 84:c9:b2:54:30:5c 84:c9:b2:54:30:5c wlan1 27943 257 0 3460 100 0 0x15
root@Iao:/etc/config# iw dev wlan1 mpath dump DEST ADDR NEXT HOP IFACE SN METRIC QLEN EXPTIME DTIM DRET FLAGS 84:16:f9:eb:c9:ae 84:16:f9:eb:c9:ae wlan1 10 358 0 1260 100 0 0x5 84:c9:b2:54:30:5c 84:c9:b2:54:30:5c wlan1 27943 257 0 1260 100 0 0x15
Dumping information about the peer nodes
Using the iw command it is possible to view quite a bit of information about the peer nodes.
root@Kahaluu:~# iw dev wlan0 station dump
Station c4:e9:84:2f:4d:de (on wlan0)
    inactive time:  0 ms
    rx bytes:   1358471
    rx packets: 4338
    tx bytes:   621897
    tx packets: 2269
    tx retries: 85
    tx failed:  1
    rx drop misc:   19
    signal:     -74 [-74] dBm
    signal avg: -74 [-74] dBm
    Toffset:    163995750460 us
    tx bitrate: 65.0 MBit/s MCS 6 short GI
    rx bitrate: 39.0 MBit/s MCS 4
    rx duration:    366589 us
    last ack signal:0 dBm
    expected throughput:    31.218Mbps
    mesh llid:  0
    mesh plid:  0
    mesh plink: ESTAB
    mesh local PS mode: ACTIVE
    mesh peer PS mode:  ACTIVE
    mesh non-peer PS mode:  ACTIVE
    authorized: yes
    authenticated:  yes
    associated: yes
    preamble:   long
    WMM/WME:    yes
    MFP:        yes
    TDLS peer:  no
    DTIM period:    2
    beacon interval:100
    connected time: 114 seconds
Station 84:c9:b2:54:30:5c (on wlan0)
    inactive time:  20 ms
    rx bytes:   366529
    rx packets: 2751
    tx bytes:   621
    tx packets: 4
    tx retries: 0
    tx failed:  0
    rx drop misc:   35
    signal:     -80 [-80] dBm
    signal avg: -79 [-79] dBm
    Toffset:    106140160060 us
    tx bitrate: 6.5 MBit/s MCS 0
    rx bitrate: 45.0 MBit/s MCS 2 40MHz short GI
    rx duration:    60280 us
    mesh llid:  0
    mesh plid:  0
    mesh plink: ESTAB
    mesh local PS mode: ACTIVE
    mesh peer PS mode:  ACTIVE
    mesh non-peer PS mode:  ACTIVE
    authorized: yes
    authenticated:  yes
    associated: yes
    preamble:   long
    WMM/WME:    yes
    MFP:        yes
    TDLS peer:  no
    DTIM period:    2
    beacon interval:100
    connected time: 114 seconds
Key information here is Signal strength, bitrate, and mesh parameters.
Configuring APs on your mesh network
Now that you have your mesh nodes all configured, and peering setup, you still need to configure some (or all) of the Nodes in AP mode. This will allow wireless devices, such as laptops, cell phones, IoT devices, to communicate across your new mesh network.
You have a choice, you can configure an AP on the 5 Ghz interface if your initial HW check displayed { AP, mesh point }. If not, then you will must use the 2.4 Ghz interface as an AP.
Configuring an AP
Configuring an AP on a node is the same as you would configure an AP on a non-mesh network router. It is easier to do via the *LuCI Web Interface, but it can also be done via the CLI.
Edit the /etc/config/wireless file, which should be default already have an AP configuration stanza
config wifi-iface 'default_radio0'
    option device 'radio0'
    option network 'lan'
    option mode 'ap'
    option key 'sEcrEt'
    option ssid 'holoholo'
    option encryption 'psk2'
Update the key with your preferred wireless password, and the SSID with the name of the AP.
Run the wifi command to reload the wireless config
Roaming from AP to AP with 802.11r
In order to enable roaming as you wander around your mesh network, you must use the same key and ssid for all of the APs on the mesh network.
If you want to add 802.11r support (for faster roaming handoff) add the following options to your AP configuration stanza. The mobility domain (4 hex digits) must be the same for each AP that allows roaming.
config wifi-iface 'default_radio0'
       ...
       # 802.11r below
       option ft_over_ds '1'
       option mobility_domain 'EAEA' # four HEX digits, hawaiian for 'air'
       option ft_psk_generate_local '1'
       option ieee80211r '1'
Or use the LuCI web interface and just check the box 
And add a four hex digit mobility domain when the box appears. 
Using your Wireless Mesh Network
Now that the mesh network is up and running, and APs have been configured and enabled, it is time to use the wireless mesh network.
Configure your wireless device to use the shared AP SSID (holoholo in this example).
The NAT64/DNS64 router (kapalua) will provide the IPv6-only addressing across the mesh network and your wireless device will obtain a SLAAC and/or DHCPv6 address.
Once your wireless device has an IPv6 address, the world is at your finger tips.
Downside to using Wireless Mesh
All of those wireless hops come at an additional cost of higher latency and lower throughput. Since each wireless hop must store and forward each packet, there is additional latency added. And if you chose to use 5 Ghz APs, then each AP must share the same access channel as the mesh channel, adding additional latency.
Latency & Throughput
Use ping to measure latency across the mesh network.
$ ping -c10 6paikea.hoomaha.net
PING 6paikea.hoomaha.net(2607:c000:8011:fd44:1867:49ff:fee8:555b) 56 data bytes
64 bytes from 2607:c000:8011:fd44:1867:49ff:fee8:555b: icmp_seq=1 ttl=62 time=2.84 ms
64 bytes from 2607:c000:8011:fd44:1867:49ff:fee8:555b: icmp_seq=2 ttl=63 time=9.43 ms
64 bytes from 2607:c000:8011:fd44:1867:49ff:fee8:555b: icmp_seq=3 ttl=63 time=4.50 ms
64 bytes from 2607:c000:8011:fd44:1867:49ff:fee8:555b: icmp_seq=4 ttl=63 time=9.31 ms
64 bytes from 2607:c000:8011:fd44:1867:49ff:fee8:555b: icmp_seq=5 ttl=63 time=9.83 ms
64 bytes from 2607:c000:8011:fd44:1867:49ff:fee8:555b: icmp_seq=6 ttl=63 time=9.45 ms
64 bytes from 2607:c000:8011:fd44:1867:49ff:fee8:555b: icmp_seq=7 ttl=63 time=2.46 ms
64 bytes from 2607:c000:8011:fd44:1867:49ff:fee8:555b: icmp_seq=8 ttl=63 time=5.93 ms
64 bytes from 2607:c000:8011:fd44:1867:49ff:fee8:555b: icmp_seq=9 ttl=63 time=9.03 ms
64 bytes from 2607:c000:8011:fd44:1867:49ff:fee8:555b: icmp_seq=10 ttl=63 time=9.24 ms

--- 6paikea.hoomaha.net ping statistics ---
10 packets transmitted, 10 received, 0% packet loss, time 44ms
rtt min/avg/max/mdev = 2.457/7.202/9.831/2.816 ms
Compared to a wired connection, where the latency is about 1 ms.
Throughput
Transferring a 251 MB video file from RAM disk to RAM disk, using scp on a Raspberry Pi 3B+. All times measured by scp.
| Rate | Time | Comment |
|---|---|---|
| 7.4MB/ | 00:33 | Wired with Powerline adapters |
| 20.6MB/s | 00:12 | Wired GigE on same network |
| 2.6MB/s | 01:35 | Mesh with 1 hop – same channel |
| 4.0MB/s | 01:03 | Mesh with 1 hop – 2.4 Ghz access, 5 Ghz Mesh |
| 17.8MB/s | 00:14 | Direct connect to 802.11n bridged |
| 11.8MB/s | 00:21 | Direct connect to 802.11ac routered |
The 3B+ Pi although equipped with a GigE interface, is throughput limited to 200 Mbit, but that is enough for this testing.
As it can be seen, a traditional router (non-mesh) has much better throughput. And bridged Wifi is faster than routed Wifi (in the traditional router scenarios).
802.11r Fast Roaming Performance
How fast is Fast Roaming (802.11r)? Walking between two APs, noted an extra long ping when the switch happens.
$ ping 6paikea.hoomaha.net
PING 6paikea.hoomaha.net(2607:c000:8011:fd44:1867:49ff:fee8:555b) 56 data bytes
64 bytes from 2607:c000:8011:fd44:1867:49ff:fee8:555b: icmp_seq=1 ttl=62 time=8.70 ms
64 bytes from 2607:c000:8011:fd44:1867:49ff:fee8:555b: icmp_seq=2 ttl=63 time=8.65 ms
64 bytes from 2607:c000:8011:fd44:1867:49ff:fee8:555b: icmp_seq=3 ttl=63 time=8.40 ms
...
64 bytes from 2607:c000:8011:fd44:1867:49ff:fee8:555b: icmp_seq=27 ttl=63 time=3.97 ms
64 bytes from 2607:c000:8011:fd44:1867:49ff:fee8:555b: icmp_seq=28 ttl=63 time=403 ms  <====
64 bytes from 2607:c000:8011:fd44:1867:49ff:fee8:555b: icmp_seq=29 ttl=63 time=3.46 ms
64 bytes from 2607:c000:8011:fd44:1867:49ff:fee8:555b: icmp_seq=30 ttl=63 time=10.1 ms
64 bytes from 2607:c000:8011:fd44:1867:49ff:fee8:555b: icmp_seq=31 ttl=63 time=15.9 ms
Without 802.11r enabled, I noted that my test the wireless device (a Chromebook) would not switch APs, even though the Chromebook was right next to another AP until it was put to sleep and reawakened.
IPv6 Support
Since 802.11s wireless mesh, is a layer 2 protocol, it is possible to configure an IPv6-only network on top of the mesh network.
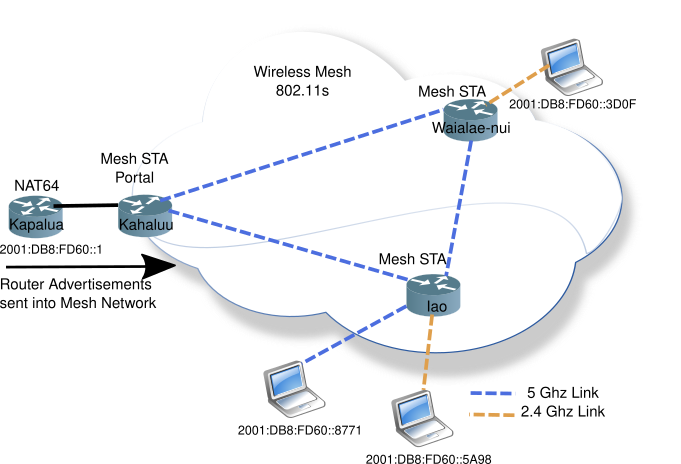
Router Advertisements are sent into the mesh network normally, as one would expect. Neighbour discovery (NDP) which also uses multicast works correctly.
Of course, one doesn’t need to run an IPv6-only network as part of a wireless mesh network, but many issues can be flushed out by running IPv6-only.
Conclusion: A matter of size
Looking at the Commercial Wireless Mesh Products online, the prices range from about $200-$1000. All of them make claims of covering 400-600 m2 (4000 to 6000 square feet). That is a really large house, or you just want to give your horses Wifi in the barn.
Perhaps only a distant room or office requires a stronger wireless signal. OpenWrt supports Wireless Distribution System (WDS), which is much easier to configure, can easily extend your wireless coverage.
Wireless mesh has its place in large area loop-free distribution of wireless networking. However, most SOHO (Small Office/Home Office) environments will not require the broad area coverage that 802.11s provides.
More info
Originally published on www.makiki.ca