Linux Containers Part 2

|
Although you can turn your Pi into an OpenWrt router, it never appealed to me since the Pi has so few (2) interfaces. But playing with LXD, and a transparent bridge access for the containers, it made sense that it might be useful. But after creating a server farm on a Raspberry Pi, I can see where there are those who would want to have a firewall in front of the servers to reduce the threat surface.
Docker attempts this, by fronting the containers with the dockerd daemon, but the networking is klugy at best. If you choose to go it on your own, and use Docker’s routing, you will quickly find yourself in the 90s where everything must be manually configured (address range, gateway addresses, static routes to get into and out of the container network). The other option is to use NAT44 and NAT66, which is just wrong, and results in a losing true peer to peer connectivity, limited server access (since only 1 can be on port 80 or 443), and the other host of brokenness of NAT.
OpenWrt is, on the other hand, a widely used open-source router software project, running on hundreds of different routers. It includes excellent IPv6 support, including DHCPv6-PD (prefix delegation for automatic addressing of the container network, plus route insertion), an easy to use Firewall web interface, and full routing protocol support (such as RIPng or OSPF) if needed.
Going Virtual
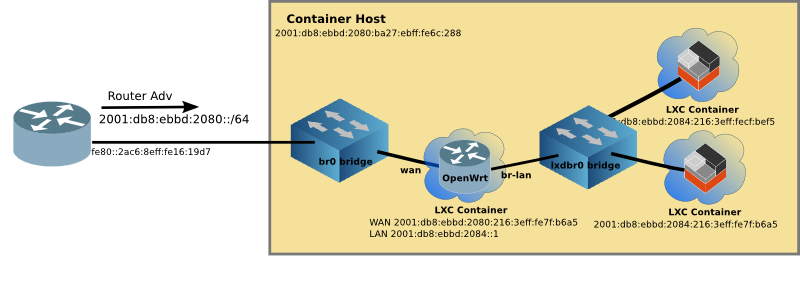
The goal is to create a virtual environment which not only has excellent network management of LXC, but also an easy to use router/firewall via the OpenWrt web inteface (called LuCI), all running on the Raspberry Pi (or any Linux machine).
Motivation
OpenWrt project does an excellent job of creating images for hundreds of routers. I wanted to take a generic existing image and make it work on LXD without recompiling, or building OpenWrt from source.
Additionally, I wanted it to run on a Raspberry Pi (ARM processor). Most implementations of OpenWrt in virtual environments run on x86 machines.
If you would rather build OpenWrt, please see the github project https://github.com/mikma/lxd-openwrt (x86 support only)
Installing LXD on the Raspberry Pi
Unfortunately the default Raspian image does not support name spaces or cgroups which are used to isolate the Linux Containers. Fortunately, there is a Ubuntu 18.04 image available for the Pi which does.
If you haven’t already installed LXD on your Raspberry Pi, please look at Linux Containers on the Pi blog post.
Creating a LXD Image
NOTE: Unless otherwise stated, all commands are run on the Raspberry Pi
Using lxc image import an image can pulled into LXD. The steps are:
- Download the OpenWrt rootfs tarball
- Create a metadata.yaml file, and place into a tar file
- Import the rootfs tarball and metadata tarball to create an image
Getting OpenWrt rootfs
The OpenWrt project not only provides squashfs and ext4 images, but also simple tar.gz files of the rootfs. The (almost) current release is 18.06.1, and I recommend starting with it.
The ARM-virt rootfs tarball can be found at OpenWrt
Download the OpenWrt 18.06.1 rootfs tarball for Arm.
Create a metadata.yaml file
Although the yaml file can contain quite a bit of information the minimum requirement is architecture and creation_date. Use your favourite editor to create a file named metadata.yaml
architecture: "armhf"
creation_date: 1544922658
The creation date is the current time (in seconds) since the unix epoch (1 Jan 1970). Easiest way to get this value it to find it on the web, such as the EpochConverter
Once the metadata.yaml file is created, tar it up and name it anything that makes sense to you.
tar cvf openwrt-meta.tar metadata.yamlImport the image into LXD
Place both tar files (metadata & rootfs) in the same directory on the Raspberry Pi. And use the following command to import the image:
lxc image import openwrt-meta.tar default-root.tar.gz --alias openwrt_armhf
Starting up Virtual OpenWrt
Unfortunately, the OpenWrt image won’t boot with the imported image. So a helper script has been developed to create devices in /dev before OpenWrt will boot properly.
The steps to get your virtual OpenWrt up and running are:
- Create the container
- Adjust some of the parameters of the container
- Download
init.shscript from github - Copy the
init.shscript to/rooton the image - Log into the OpenWrt container and execute
sh init.sh - Validate that OpenWrt has completed booting
I use router as the name of the OpenWrt container
lxc init local:openwrt_armhf router
lxc config set router security.privileged true
In order for init.sh to run the mknod command the container must run as privileged.
Download init.sh from the OpenWrt-LXD open source project
The init.sh script is open source and resides on github. To download it on your Pi, use curl (you may have to install curl)
curl https://raw.githubusercontent.com/cvmiller/openwrt-lxd/master/init.sh > init.shAfter copying the script to the container, Log into the router container using the lxc exec command, and run the init.sh script.
lxc exec router sh
#
# sh init.sh
Managing the Virtual OpenWrt router
The LuCI web interface by default is blocked on the WAN interface. In order to manage the router from the outside, a firewall rule allowing web access from the WAN must be inserted. It is possible to edit the /etc/config/firewall file within the OpenWrt container and open port 80 for external management.
lxc exec router sh

# vi /etc/config/firewall

...
config rule
        option target 'ACCEPT'
        option src 'wan'
        option proto 'tcp'
        option dest_port '80'
        option name 'ext_web'
Save the file and then restart the firewall within the OpenWrt container.
/etc/init.d/firewall restart
Now you should be able to point your web browser to the WAN address and login, password is blank.
Step back and admire work
Type exit to return to the Raspberry Pi prompt. By looking at some lxc output, we can see the virtual network up and running.
$ lxc ls
+---------+---------+------------------------+-----------------------------------------------+------------+-----------+
|  NAME   |  STATE  |          IPV4          |                     IPV6                      |    TYPE    | SNAPSHOTS |
+---------+---------+------------------------+-----------------------------------------------+------------+-----------+
| docker1 | RUNNING | 192.168.215.220 (eth0) | fd6a:c19d:b07:2080:216:3eff:fe58:1ac9 (eth0)  | PERSISTENT | 0         |
|         |         | 172.17.0.1 (docker0)   | fd4b:7e4:111:0:216:3eff:fe58:1ac9 (eth0)      |            |           |
|         |         |                        | 2001:db8:ebbd:2080:216:3eff:fe58:1ac9 (eth0)  |            |           |
+---------+---------+------------------------+-----------------------------------------------+------------+-----------+
| router  | RUNNING | 192.168.215.198 (eth1) | fd6a:c19d:b07:2084::1 (br-lan)                | PERSISTENT | 1         |
|         |         | 192.168.181.1 (br-lan) | fd6a:c19d:b07:2080::8d1 (eth1)                |            |           |
|         |         |                        | fd6a:c19d:b07:2080:216:3eff:fe72:44b6 (eth1)  |            |           |
|         |         |                        | fd4b:7e4:111::1 (br-lan)                      |            |           |
|         |         |                        | fd4b:7e4:111:0:216:3eff:fe72:44b6 (eth1)      |            |           |
|         |         |                        | 2001:db8:ebbd:2084::1 (br-lan)                |            |           |
|         |         |                        | 2001:db8:ebbd:2080::8d1 (eth1)                |            |           |
|         |         |                        | 2001:db8:ebbd:2080:216:3eff:fe72:44b6 (eth1)  |            |           |
+---------+---------+------------------------+-----------------------------------------------+------------+-----------+
| www     | RUNNING | 192.168.181.158 (eth0) | fd6a:c19d:b07:2084:216:3eff:fe01:e0a3 (eth0)  | PERSISTENT | 0         |
|         |         |                        | fd4b:7e4:111:0:216:3eff:fe01:e0a3 (eth0)      |            |           |
|         |         |                        | fd42:dc68:dae9:28e9:216:3eff:fe01:e0a3 (eth0) |            |           |
|         |         |                        | 2001:db8:ebbd:2084:216:3eff:fe01:e0a3 (eth0)  |            |           |
+---------+---------+------------------------+-----------------------------------------------+------------+-----------+
The docker1 container is still running from Part 1, and still connected to the outside network br0. You can see this by the addressing assigned (both v4 and v6).
The router container (which is running OpenWrt) has both eth1 (aka WAN) and br-lan (aka LAN) interfaces. The br-lan interface is connected to the inside lxdbr0 virtual network. And OpenWrt routes between the two networks.
Limitations of Virtual OpenWrt
There are some limitations of the virtual OpenWrt. Please see the github project for the most current list. Most notably, ssh although it works, needs improving.
Address Stability
Because all of this is running on LXC, there is address stability. Not matter how many times you reboot the Raspberry Pi, or restart containers in different order, the addresses remain the same. This means the addresses above can be entered into your DNS server with out churn. Something Docker doesn’t provide.
Running a Virtual Network
LXC is the best at container customization, and virtual networking (IPv4 and IPv6). With LXCs flexibility, it is easy to create templates to scale up multiple applications (e.g. a webserver farm running in the palm of your hand). OpenWrt is one of the best Open source router projects, and now it can be run virtually as well. Now you have a server farm in the palm of your hand, with excellent IPv6 support and a firewall! Perhaps the Docker folks will take note.
Article originally appeared (with more detail) on www.makikiweb.com