With world-wide IPv6 usage, as measured by Google, at around 45%, questions arise, how do we push it higher? What is left to be done?
Education is the Key
Technological evolution occurs in different places and times. Formal training, and On the Job Training (OJT) are just some of the ways technological learning occurs.
Because I am an IPv6 evangelist, about six years ago I started working with a local college here in Victoria, BC to add IPv6 to their instruction. At the time, there was no IPv6 on campus. The Computer Science Department, and some instructors were open to bringing IPv6 to the class room. I was invited to be a guest lecturer for the IPv6 part of the lesson plan.
In those early days, I brought an OpenWrt router into the Lab, and injected RAs for hands-on students learning. We covered the basics of IPv6, and more importantly, how to open a listening socket for IPv6 (and IPv4).
The department got the College’s IT group on board, which requested and received an IPv6 PI Block. They now use their own IPv6 address space in the lab for students.
Capstone
In this college, Capstone is a final-semester-long project, where students work with sponsors to create a project useful for the sponsor, which provides a real-world learning experience for the students.
I was invited to be a sponsor, submit a project, and not surprisingly it included IPv6. During the project selection process, the sponsors interviewed over 50 students looking for a good fit with the proposed projects.
All of the students I interviewed knew about IPv6, thanks to the work the CS Department had done. They were far from experts, but knowing that IPv6 exists put them a step ahead.
The project selection process is still in progress, hopefully some of the students will be interested in the IPv6 project.
Starting early
If IPv6 is going to conquer the world, and because IPv6 is truly the future of the internet, then we need the young network designers to be thinking about how to eliminate the complexities of NAT from our networks. To re-think how to build networks with simplicity and non-repudiation again. To build peer-to-peer networks, and move away from the centralized-server model (because of NAT), that is so prevalent today.
There are gobs of software applications which already support IPv6, if only, they were configured to use it. Let’s work together to get IPv6 into our schools, get our youth thinking about doing amazing peer-to-peer things using IPv6.
With IPv6 utilization between 40-45%, it may be time to consider moving from dual-stack to IPv6-only. At least, set up a test network to better understand what IPv6-only looks like, and how it can make your life easier as a network/system administrator.
By running IPv6-only you gain some quick benefits:
Only one set of ACLs (or Firewall rules): already half the work
Easier to troubleshoot the network: No following IP addresses as they change from NAT point to the next
No guessing if Happy Eyeballs is covering up network issues: it won’t (hint: no happy eyeballs help in IPv6-only)
Of course, IPv6-only means you will start dreaming in Hexadecimal, and you may want to start small, like a test network first.
Running NAT64/DNS64
Running IPv6-only means you will want to run NAT64 and DNS64 servers. I have written in the past on how to setup OpenWrt for DNS64/NAT64. There is still a lot of IPv4 out there on the internet. In order for your IPv6-only network, you will need to translate to IPv4 when IPv6-only devices are talking to IPv4-only devices on the internet. For that NAT64 is the industry solution.
But you don’t need a big expensive router to gain IPv6-only (and NAT64) knowledge. Using an inexpensive consumer router, and running OpenWrt on it, you can then use jool to provide the NAT64 functionality. I have written in the past on configuring jool for NAT64.
IPv6-only network with NAT64/DNS64 to connect to the IPv4-only world
NAT64/DNS64 is one of those services, that as time goes on, it is used less and less. As more web sites are IPv6-enabled, the need for NAT64 translation is reduced.
PREF64 (RFC 8781)
While it is possible to use the Well Known Address (WKA) of 64:ff9b::/96 for small SOHO networks, you may choose to use an address within your IPv6 address allocation block. Why? Because you really only need one NAT64 server in your network (unless you have a huge multi-site network), and you can route packets across your network to the location of the NAT64 server.
If you choose an address in your allocation, you will want to inform the hosts the location of your NAT64 service. This can be done with the recently standardized PREF64 addition to Router Advertisements (RAs). RFC 8781 specifies how this is done.
However, OpenWrt in the most recently release v23.05.0, supports PREF64. The web GUI, LUCI, can make this easy. In my example, I am using the WKA, because my IPv6-only sub-network is only a single network (for now).
To use the web GUI, login, then go to Network->Interfaces->Edit LAN->DHCP Server tab->IPv6 RA Settings tab
Put in the address of your NAT64 server in the NAT64 Server blank. Hit save then save and apply and your done!
Or you can edit /etc/config/dhcp on the router and add the following:
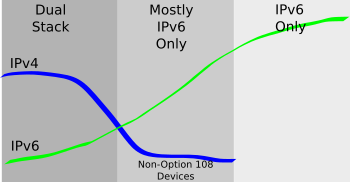
Dual-stack to IPv6-only transition isn’t a black or white activity. With help, such as DHCPv4 Option 108 (IPv6-only preferred, RFC 8925) and PREF64 (RFC 8781) can ease a dual-stack network into a mostly-IPv6-only network. The goal is to get to a future-proof single stack network. These tools will help you get there.
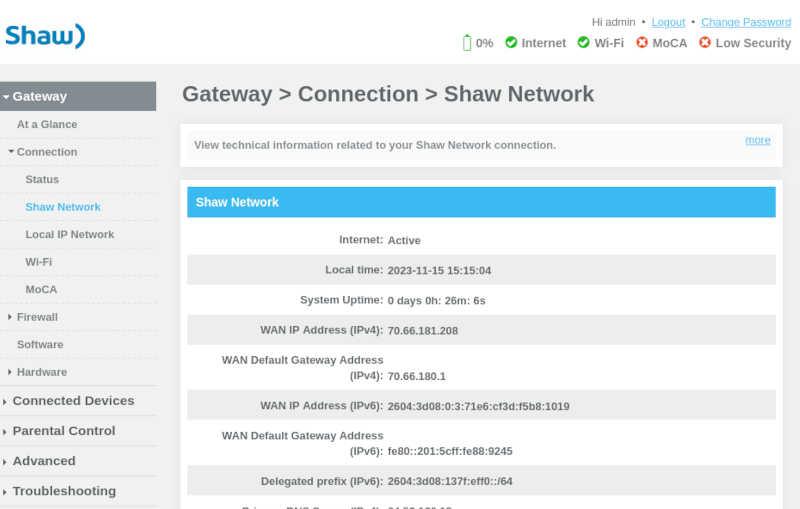
For years I have been using a third party ISP for my IPv6-enabled internet. Alas, third party ISPs rely on last mile incumbent carriers to connect to their customers. It all works well, until it doesn’t. This fall, the last mile was disconnected from my ISP not once, but three times. After sitting in the Internet darkness for over a week, I decided to go with another ISP.
Earlier this year, Rogers, a large ISP in Canada, bought Shaw Communications, an incumbent ISP here in Western Canada. Having been a Rogers customer about 10 years ago, I knew that they knew IPv6. Unfortunately, the same can not be said about Shaw, as they were only giving out /64s, and only for their top tier (read: most expensive) customers. Shaw had a /32 from ARIN, so they would have to have 4 billion customers before having to request another /32.
I was hoping that Rogers would be able to teach the Shaw folks a bit more about IPv6. And they kind of have, but the Shaw ways are still strong.
Installing Rogers/Shaw Internet Service
I learned when working at the University of Hawaii, that one does things differently when having to scale the task up. For example, say it takes 2 minutes to add a new user to your systems. No problem, until you have 30,000 new users to add every semester, now it takes 41 days! Better come up with a more scalable system.
Rogers/Shaw supports self install, where they send the customer a DOCSIS cable modem/router. The customer unboxes the cable modem/router and plugs it into the cable, and power. It is expected that the customer will connect to the router-half via Wifi. And the customer is online.
A word about modem/routers
Modem comes from Modulator/Demodulator. Its purpose it to put a signal on a wire (phone lines, coax, etc). A router is something that routes IP packets. In this modern age, ISPs often send/sell customers a single box that does both functions.
XB6 with a sloped top, prevents you from stacking things on it
Cable Modem/Router XB6 defaults to a single /64
After following the self install instructions, it was clear that I had only received a prefix delegation (PD) with a single /64.
And the software in the XB6 router does not permit changing the Prefix Delegation size! Clearly the old Shaw ways are hard to stamp out.
Bridge Mode
Fortunately, Rogers/Shaw knows that their router may not be up to the task, and provide documentation on how to put their router in bridge mode, effectively turning their device into just a cable modem.
Once the ISP provided router (an XB6) has been placed into bridge mode, it is easy to use one of the Ethernet ports to connect to an OpenWrt router, and let it handle the routing of IP packets.
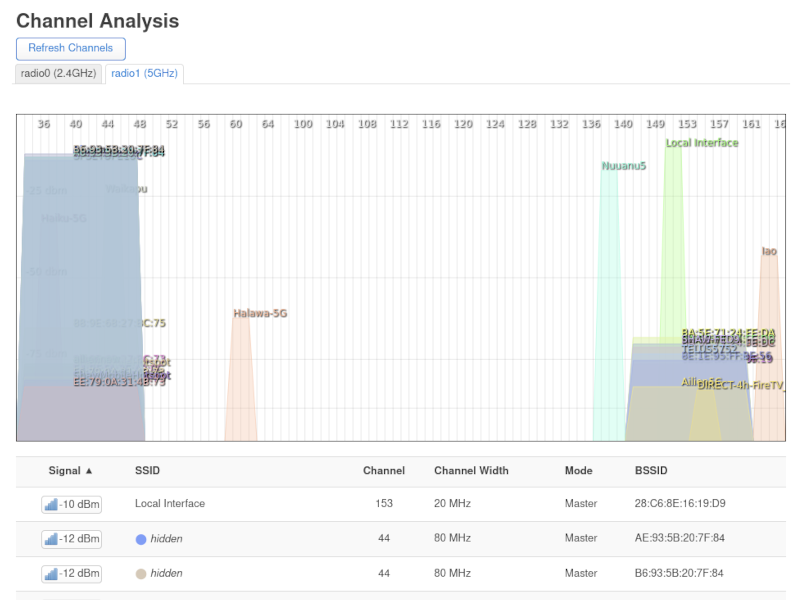
Unfortunately, bridge mode does not disable the Wifi as the documentation states. Instead, it leaves a SSID with the name ShawMobileHotspot turned on. This is a shadow network, that Shaw used/uses for their cellular customers. It is possible to log into the my.shaw.ca page, and disable ShawMobileHotspot, but unfortunately, it doesn’t actually disable the Wifi.
Using OpenWrt’s Channel Analysis, you can see that disabling the ShawMobileHotspot only changed the SSID to “hidden”. And it is still transmitting on Channel 44 (and one can’t change the channel either).
After searching online a bit, I found a note in the Comcast forums which described the steps to disable the Wifi in bridge-mode:
Plug your laptop directly into the XB6 modem/router Ethernet port
Statically define your laptop as 10.0.0.10/24
Point your browser at 10.0.0.1, and log into the XB6
Switch the XB6 out of bridge mode, let it reboot
Log back into the XB6, and disable the Wifi on both 2.4Ghz and 5Ghz
Switch back to bridge mode, and let it reboot again
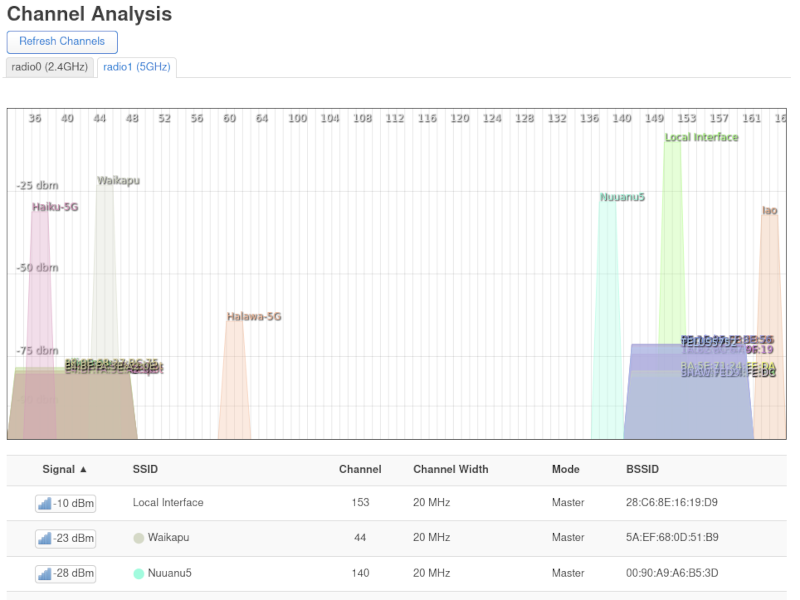
Once all that is done, plug your OpenWrt router back into the XB6, and the Channel 44 spectrum should look much clearer. The XB6 Wifi has actually been disabled.
Now you can actually see my two routers which were obscured (and interfered with) by the XB6 Wifi.
OpenWrt to the rescue
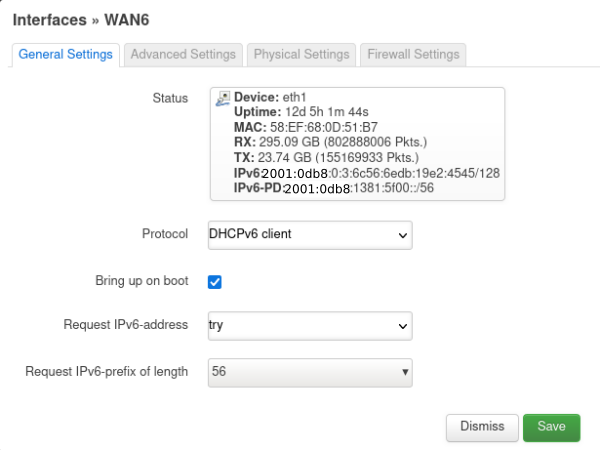
OpenWrt has excellent IPv6 support, and the defaults are usually enough to get you up and running. That was my first attempt, and I received a prefix delegation (PD) of /64. Dang!
Fortunately, OpenWrt has the ability to request a specific size of PD. By requesting a /56, I was pleasantly surprised to get a /56! Now I had address space room to prefix-delegate down to the ten IPv6 subnets I run in my house.
Note the “Request IPv6-prefix of length” at the bottom
What doesn’t work
I no longer have a static prefix (my old ISP rented one for $3/mo). Fortunately, the prefix is on a long DHCPv6 lease (about 14 days), which allows me to keep the same prefix through router reboots.
However, there are still things which rely on the IPv6 prefix:
Firewall rules – Some are host specific, and therefore a prefix change will make the firewall rules stop working
Self assigned prefix delegations – Because of OpenWrt’s algorithm to divide a prefix address space by four, and allocate 1/4 address space to the downstream routers, it can be challenging to get everything to automatically address downstream PD. Therefore on a couple of routers, I disable “Request IPv6-prefix of length” and in /etc/config/network of the router I assign my own delegated prefixes (from the delegated /56):
config interface 'wan6'
    option device 'eth0'
    option proto 'dhcpv6'
    list ip6prefix 'fd01:0db8:CAFE:fd60::/60'
    list ip6prefix '2001:0db8:1381:5f60::/60'
    option reqprefix 'no'
    option reqaddress 'try'
I’ll need to create a script which will renumber the few routers which have the Rogers/Shaw prefix configured to make the change scale better (for now I am using sed)
Using ULA address space as a Management Plane
I usually recommend against using ULAs. However, I quickly discovered when my internet was down that I couldn’t get to any of my routers or hosts by name. My DNS server had GUAs (Global Unique Addresses) with a non-existent delegated prefix.
And because my Roger’s prefix is not guaranteed to not change, I have opted to use a ULA address space as a management plane to get to my local routers and hosts (I do not have IPv4 A records in my DNS server, as that would prevent the ULA address from being used).
Happy with Rogers
Overall, I’d have to say I am pretty happy being a Rogers customer again, now that I have a relatively stable /56 prefix. Thanks goodness the ISP supplied routers have bridge-mode, and I can use my OpenWrt router.
Although this sounds straight forward however, IPv6 addressing becomes a challenge.
IPv6 Addressing, PI or PA?
Most SOHOs get their IPv6 address block from their ISP, this is called Provider Aggregatable (PA) addressing. Because the address block is loaned to the customer by the ISP, the ISP can choose to change the block prefix at will. For example, my IPv6 address block changes every time my PPPoE reconnects to my ISP.
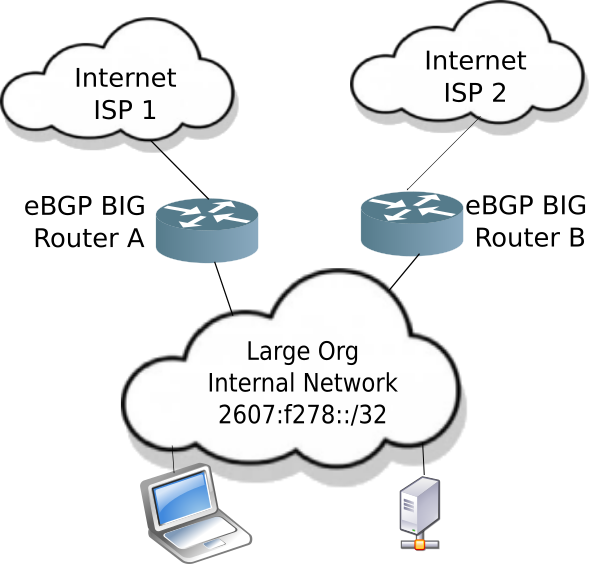
Conversely, larger organizations will apply to their Regional Internet Registry (RIR) for Provider Independent (PI) address space. PI address space means the organization has a block of addresses that are globally unique, and the addressing won’t change if the organization changes upstream internet providers (think: large ISP).
PI Addressing requires BIG routers
Large organizations will use eBGP (external Border Gateway Protocol) to learn all of the routes of the internet. The current size (in September 2023) of internet IPv4 routes is 933,452 [cidr-report]. And the internet has 193,885 IPv6 routes [cidr-report]
That means the router must hold over one million routes to access every network on the internet. This requires a router with a lot of memory, and processor power. And if you want to be dual homed (most large organizations are), then you need at least two BIG routers, one for each upstream internet provider.
Large Organization network with BIG routers
This is clearly more expense that the typical SOHO can absorb.
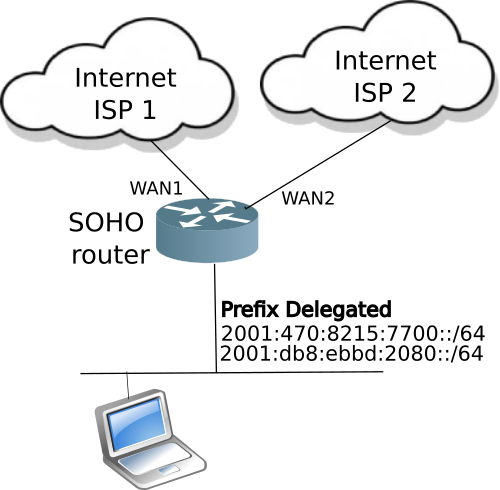
Most SOHOs use PA address space
To avoid the costs of running and configuring really BIG routers, most SOHOs will use PA address space, provided by their ISP. The ISP will usually allocate a single IPv4 address (to be used with NAT44), and an IPv6 block of /56, /60, or sadly, only a /64 to their customer.
This configuration works well for a single ISP attached network. Because the routers use a default route pointing upstream to the ISP, the router can be small, and have limited memory. If the ISP decides to change the IPv4 address or the prefix of the IPv6 allocated block, the small SOHO router will adapt. The router upddates NAT44 for IPv4, and will refresh its DHCPv6-PD (prefix delegation) to advertise a new prefix into the SOHO network. It all works well.
Well, OK, having the ISP change prefixes often is a problem for running your own DNS for your SOHO network, but there are solutions (such as dynamic DNS, or ip6neigh)
The challenge of Dual Homed network with PA address space
The challenge of a dual homed environment is what happens with two separate ISPs provide two separate IPv4 addresses, and two separate IPv6 PA address blocks?
Let’s handle the IPv4 situation first. The answer is not much. Since NAT44 is utilized, the ISP connected router will NAT the internal IPv4 network to one (or both) of the allocated IPv4 addresses. There will be two default routes pointing to each ISP, one will have a lower cost, and be the primary. Done.
Three ways to provide IPv6 high availability
Since IPv6 PA address blocks are globally unique, handling two blocks is a little trickier. There are three different techniques to provide high availability for IPv6:
use NAT66, following the IPv4 model: This has at least two issues: it breaks end-to-end connectivity, and there is no NAT66 standard
use NPTv6: Network Prefix Translation (RFC 6296) is kind of like NAT66, but only translates the prefix portion of the address. The IID (Interface ID, or lower 64 bits of an IPv6 address) remains the same, so although end-to-end connectivity is technically broken, the IID remains the same, and non-reputability can be maintained.
Use two prefixes on the SOHO network and let source address selection (RFC 6724) at the host take care of using the right prefix.
Running two IPv6 prefixes on one network
This summer, I happened to have two ISP connections to my house, and I thought I would try option 3 (above). I didn’t like the NAT66 option, as I believe we should be eliminating NAT from our networks as we migrate to IPv6. I didn’t like NPTv6 because when the primary ISP goes down, your PA space goes away (well technically it won’t disappear until your DHCPv6-PD lease expires). Because of the loss of the GUA prefix, I believe NPTv6 requires the use of ULAs (Unique Local Addresses), which for the most part should be avoided.
So I thought I would try option 3, after all, it maintains end-to-end connectivity, and there is a standard for the hosts to select the right prefix. It should just work.
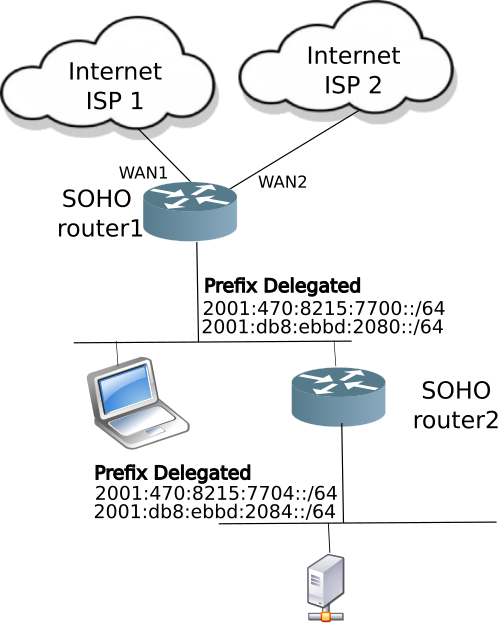
For the dual homed SOHO network and IPv6, the ISP connected router will have to support two upstream DHCPv6-PD sessions, and advertise both of address blocks downstream into the SOHO network.
Simple dual-homed SOHO Netwwork
Each host on the SOHO network will use RFC 6724 for source address selection, and everything will appear to work.
Now a failure occurs
Now, one of the ISPs ceases to function. This failure could be a direct (the WAN link went down) or it could be further upstream in the ISP (the WAN link is OK, but the ISP is not passing traffic). What happens in the IPv6 SOHO network?
Real problems.
If there is a WAN failure, and your router is smart enough, it will withdraw the prefix on the ISP that went down (by advertising the prefix in its RA with a lifetime of zero). But this only works for SLAAC and won’t work for hosts which obtained a DHCPv6 address (they will hang onto the prefix until the DHCPv6 lease expires).
If the failure is upstream inside the ISP network, and the WAN link is still up then the SOHO router will not know there is a problem, and will not withdraw the prefix until the upstream DHCPv6-PD lease expires.
If your SOHO network has any downstream routers, the DHCPv6 lease timeout problem cascades, and hosts could find themselves trying to use a prefix that has been dead for hours, meanwhile there continues to be a working ISP link to the outside world, and some of the hosts (which selected that associated prefix) will work, while others will not.
SOHO Network with cascaded router
An attempt to fix the problem with controlling SOHO routes
I have written in the past that I am a big fan of running RIPng in SOHO networks. One doesn’t need to be a router jockey to setup RIPng. I wrote a script which runs on an OpenWrt router which would detect WAN link or upstream connectivity problems, and change the cost of RIPng injected default route into the SOHO network (yes, this is starting to look like router-jockey job). It did work, in changing the cost of default routes injected into the SOHO network of routers.
But it didn’t solve the underlying problem, downstream routers get their IPv6 addressing via DHCPv6-PD. And that delegated prefix is not determined by routing, or even the upstream router, once the downstream router has a PD, it hangs onto it for the life of the lease. There is no protocol standard (that I am aware of) that will signal downstream routers to revoke the PD address block before the lease expires.
Therefore, while I could control the routing table (to point to one ISP or the other), I could not withdraw the delegated prefix of downstream routers, without writing a script to run on them, and create a protocol to signal when the PD block should be removed. This was in serious router-jockey land, and beyond the typical SOHO network.
High availability in the SOHO
As we have seen there are two working choices to have a dual homed SOHO network:
Do what the large organizations do: run really BIG routers and eBGP
Run NPTv6 and ULAs in your SOHO network, not the best, but it can work.
Or use the simple answer, pick up your cell phone, and tether to it until your ISP connectivity is restored.
Notes:
It is unfortunate, but some ISPs will only issue a /64 (via DHCPv6-PD), even when the router requests a larger block.
Neither DHCPv6 RFC 8415 or DHCPv6-PD requirements RFC 3789 describe a mechanism to revoke an active DHCP-PD lease.
I was recently traveling in Europe. My journey took me to Italy first, so I picked up a tourist SIM card for my phone with 50 GB of data (for a 30 day period), all for the low price of €45. I now had oodles of data, and could easily tether my laptop to my phone for internet access.
IPv4-only Landscape
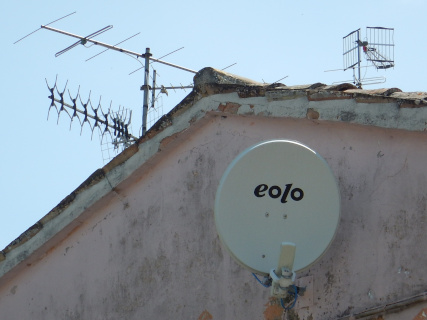
Sadly, the internet access that Vodaphone Italy provided was IPv4-only. And I found the same at the Rome airport (but to be fair most airport Wifis are IPv4-only). Even a local wireless internet provider, Eolo in Abruzzo was IPv4-only.
Tethering for Internet
I was staying in a small village outside of Teramo (100km NE of Rome), and internet was only via tethering to my phone. And life would have been IPv4-only, except I had brought my OpenWrt travel router (a GL-iNET AR750S), which has Wireguard configured to VPN IPv6 back to my house (see Wireguard IPv6 VPN).
Wireguard can punch through multiple layers of NAT44.
Avoiding the double Wifi Hop
Initially, I had the router connected to my cellphone hotspot via Wifi. But that incurs a double Wifi hop, which increases latency. I followed the excellent OpenWrt guide to USB Tethering to configure the router and connect it the cell phone directly. The guide even covers the additional steps needed for Apple iPhone tethering.
Thanks to 4G tethering, I now had IPv6, via the Wireguard VPN.
The disadvantage of cellular roaming
I also traveled to Sweden, hoping that IPv6 support would be better on cellular. Alas, it was not to be. Although Europe has regulations about roaming in other EU countries that also means that your service in your home country should be the same in the roamed country.
Which means that although I had a strong 4G signal in Sweden with a local carrier, I was still limited to vodaphone.it’s IPv4-only service. Fortunately, I had a tethering/IPv6 VPN router ready to roll.
Bringing new wine to old bottles
Traveling is always full of new experiences. Maybe I shouldn’t have been surprised that the old country of Italy was still running on IPv4-only.
Fortunately, a light-weight little travel router such as the GL-iNET AR750S running OpenWrt can provide IPv6 even in the land of ancient Rome.
I didn’t do an extensive survey of Italian ISPs for IPv6 support. The ones I encountered did not support IPv6.
Yes, the latency removed by USB-tethering doesn’t really make up for the latency of transporting my IPv6 traffic all the way back to Canada, but it was a start.
With the expanded address space, and the introduction of letters (A thru F), it is possible to embed words into an address, making it easier to recognize the source of that address. Facebook is a common example where they have embedded face:b00c into the address
$ host facebook.com
facebook.com has address 157.240.3.35
facebook.com has IPv6 address 2a03:2880:f101:83:face:b00c:0:25de
Other common examples are dead:beef or cafe.
Using Vanity Addressing with Link-Local interfaces
A colleague suggested using Vanity Link-Local Addresses, primarily to make pinging the next hop interface easier. A simple use would be the upstream router is ::1, and the downstream router would be ::2. From the downstream router, one would ping:
$ ping fe80::1%eth0

64 bytes from fe80::1%eth0: icmp_seq=1 ttl=64 time=3.97 ms
64 bytes from fe80::1%eth0: icmp_seq=2 ttl=64 time=4.60 ms
Because link-local prefix of fe80:: is on every interface, the address must be scoped with the %eth0.
This certainly makes less typing, and faster troubleshooting than trying to look up the link-local address of the next hop router.
Using Vanity Link-Local Addressing as part of your addressing plan
My SOHO network is probably a little more complex that most. But this technique can also be applied to larger networks.
As you can see there are four basic networks (with some smaller ones not shown) in my network. I have a /56 from my ISP, and for the most part, the networks are divided on nibble boundaries.
prefix
Use
2001:db8:c011:fd00
Production network
2001:db8:c011:fd40
Testing network
2001:db8:c011:fd50
IPv6-only network
2001:db8:c011:fd80
DMZ Network
Creating Vanity Link-Local addresses from the address plan
In the old classful networking days, the IT group would have IPv4 subnets memorized. The 10 network, or the 171 network. With IPv6, it is possible to do this again, but with IPv6 prefixes.
Since, I only have a /56, the last 2 bytes of the address are mine to deploy (e.g. 2001:db8:c011:fd00). I have taken the last two bytes, and applied them to link-local addresses, such that the prefix 2001:db8:c011:fd44:: becomes a link-local address fe80::ea9f:80ff:fef3:fd44.
In a perfect world, it would just shorten this to fe80::fd44, however I run OpenWrt routers which don’t support Vanity Link-Local Addressing.
Vanity Link-Local Addressing and OpenWrt
I like OpenWrt, it is a very powerful, extremely configurable, and extendable routing platform. One can even run bird, an internet routing daemon on OpenWrt, including RIPng.
OpenWrt does use EUI-64 addressing for the Link-Local addresses, and does permit changing MAC addresses on interfaces. With this knowledge, we can embed the vanity address into the MAC address on OpenWrt.
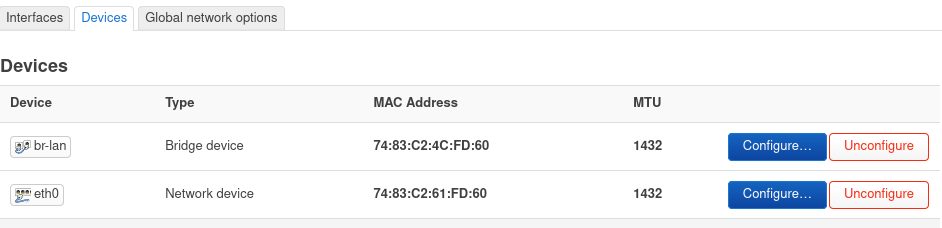
In the LuCI web interface: Network->Interfaces->Devices Tab
I have changed the last two bytes of the MAC address to FD:60
This change can also be made in the file /etc/config/network on the OpenWrt router with the addition of the option macaddr
for OpenWrt 22.03.x
config device
    option name 'br-lan'
    option type 'bridge'
    list ports 'eth1'
    list ports 'eth2'
    list ports 'eth3'
    list ports 'eth4'
    option macaddr '74:83:C2:4C:FD:60'
After rebooting your router, this will yield a pseudo vanity link-local address of: fe80::7683:c2ff:fe4c:fd60
But you say, “fe80::1 is much easier than fe80::7683:c2ff:fe4c:fd60.” And you would be right. But as I said, OpenWrt doesn’t have a facility to create simple link-local addresses like fe80::1.
Vanity Link-Local addressing and RIPng
As many readers know, I have been running RIPng (Routing Information Protocol for IPv6) for several years. RIPng isn’t a perfect routing protocol, there are better/faster protocols out there, but RIPng doesn’t require the administrator to be a router jockey to use it. Therefore I feel that RIPng is an excellent choice for SOHO (Small Office/Home Office) networks.
RIPng advertisements are like other routing protocols and is limited to the link, and will not cross routers. So link-local addresses figure heavily in understanding the sources of RIPng advertisements.
Based on creating vanity MAC addresses (which become vanity link-local addresses) you can now see that RIPng information, such as neighbours (or peers), or even the routing table is easier to understand.
Using the bird CLI utility, birdcl, you can look into what RIPng is doing. For example, looking at neighbours:
# birdcl
BIRD 2.0.11 ready.
bird> show rip neighbor
rip1:
IP address                Interface  Metric Routes    Seen
fe80::7683:c2ff:fe61:fd60 br-lan          1      4     17       #from IPv6-only router
fe80::224:a5ff:fef1:fd11  br-lan          1      2     30       #from DNS service router
fe80::ea9f:80ff:fef3:fd44 eth0.4          1      4     19       #from Test Network router
fe80::c2c1:c0ff:fe01:fda0 eth0.3          1      5     15       #from Wireguard2 router
fe80::290:a9ff:fea6:fd91  eth0.3          1      5     19       #from Wireguard1 router
bird>
As you can see, this router has five neighbours which include routers on the FD11, FD44, FD60, FD91, and FDA0 networks.
The bird folks have changed (in version 2.x) how routes are displayed, which works well for 80 column screens, but I find harder to read than the older 1.6 version.
bird> show route
Table master6:
::/0                 unicast [rip1 11:23:21.109] * (120/3)
    via fe80::58ef:68ff:fe0d:fd00 on eth0
2001:db8:8011:fd98::/64 unicast [rip1 11:23:21.109] * (120/3)
    via fe80::58ef:68ff:fe0d:fd00 on eth0
2001:db8:8011:fd60::/60 unicast [direct1 11:23:25.508] * (240)
    dev br-lan
2001:db8:8011:fd80::/64 unicast [rip1 11:23:21.109] * (120/3)
    via fe80::58ef:68ff:fe0d:fd00 on eth0
fd10:111:0:8::/62    unicast [rip1 11:23:21.109] * (120/2)
    via fe80::58ef:68ff:fe0d:fd00 on eth0
2001:db8:8011:fd44::/62 unicast [rip1 11:39:37.119] * (120/2)
    via fe80::58ef:68ff:fe0d:fd00 on eth0
2001:db8:8011:fda4::/64 unicast [rip1 11:23:21.109] * (120/3)
    via fe80::58ef:68ff:fe0d:fd00 on eth0
I find it easier to view the routes and where they are from by using the Linux ip -6 route command, which also sorts the routes.
# ip -6 route
2001:db8:8011:fd00::a1b via fe80::7683:c2ff:fe61:fd60 dev br-lan  metric 1024
2001:db8:8011:fd00::/64 dev br-lan  metric 1024
2001:db8:8011:fd00::/62 via fe80::ca9e:43ff:fe51:c04e dev br-lan  metric 1024
2001:db8:8011:fd04::/62 via fe80::ca9e:43ff:fe51:c04e dev br-lan  metric 1024
2001:db8:8011:fd08::/62 via fe80::216:3eff:feb7:c2be dev br-lan  metric 1024
2001:db8:8011:fd0c::/62 via fe80::9683:c4ff:fe15:f188 dev br-lan  metric 1024
2001:db8:8011:fd11::/64 via fe80::224:a5ff:fef1:fd11 dev br-lan  metric 1024        #FD11 DNS services
2001:db8:8011:fd40::fb0 via fe80::ea9f:80ff:fef3:fd47 dev eth0.4  metric 1024
2001:db8:8011:fd40::/64 dev eth0.4  metric 1024
2001:db8:8011:fd44::/64 via fe80::ea9f:80ff:fef3:fd47 dev eth0.4  metric 1024       #FD44 Test Network
2001:db8:8011:fd44::/62 via fe80::ea9f:80ff:fef3:fd47 dev eth0.4  metric 1024
2001:db8:8011:fd60::/60 via fe80::7683:c2ff:fe61:fd60 dev br-lan  metric 1024       #FD60 IPv6-only
2001:db8:8011:fd80::a6b via fe80::c2c1:c0ff:fe01:fda1 dev eth0.3  metric 1024       #FD80 DMZ
2001:db8:8011:fd80::/64 dev eth0.3  metric 1024
2001:db8:8011:fd88::/62 via fe80::2866:2cff:fe49:d36c dev eth0.3  metric 1024
2001:db8:8011:fd98::/64 via fe80::290:a9ff:fea6:fd91 dev eth0.3  metric 1024
2001:db8:8011:fd90::/60 via fe80::290:a9ff:fea6:fd91 dev eth0.3  metric 1024
2001:db8:8011:fda0::/62 via fe80::c2c1:c0ff:fe01:fda1 dev eth0.3  metric 1024
2001:db8:8011:fda4::/64 via fe80::c2c1:c0ff:fe01:fda1 dev eth0.3  metric 1024
As you can see, not all of the routers in my network have Vanity Link-Local addresses. These are lesser routers, usually Virtual Routers (VRs), OpenWrt running inside Linux Containers (LXD) for testing. But the Vanity Link-Local addresses are there, making it easier to understand where packets are coming from.
Vanity Link-Local Addresses are a good thing
Although OpenWrt doesn’t support Vanity Link-Local addressing, it can be approximated by creating vanity MAC addresses. These address hints will help you in understanding your network topology, and bring more meaning to what would be otherwise random link-local addresses.
Notes:
Since making the drawing, I have moved the IPv6-only network prefix from FD50 to FD60, since I wanted more address space for the test network. So there will be references to both in this article.
I am using bird 1.6.6 on my older 19.07.x routers, and bird 2.0.11 in my newer 22.03.x routers, and some of the route displays will not be exactly the same.
I have added comments to route displays, such as “#FD60 IPv6-only”, to provide clarity, the comments are not displayed as part of the command output.
I have been running Linux Containers (LXD) for several years now, and I have found them really useful. The key advantages of Linux Containers are:
Running full Linux OS inside a container, which makes troubleshooting much easier (than Docker)
Cloud-like experience. Cloud computing has taken off, not just because it is someone else’s computer, but because it has made spinning up a server easy. Linux Containers provides a similar easy experience in adding a server. Some of the capabilities are: snapshots of containers, transferring containers from one host to another, quick creation and removal of containers.
Secure and scalable. Linux containers run by default, as unprivilaged thereby protecting the host system. And because Linux Containers are light weight, I have been able to scale up webserver containers to over 30 running on a Raspberry Pi 3B+.
Excellent IPv6 Support. Containers have persistent MAC addresses, and therefore will request the same IPv4 address, and form the same SLAAC addresses after every reboot, regardless of container boot order (unlike Docker).
Connecting your Container to the Internet
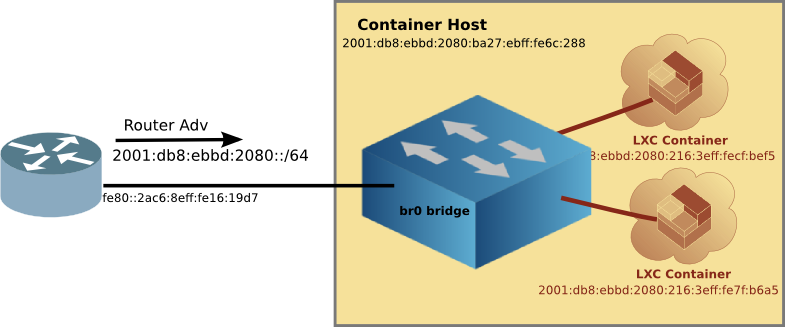
As an old networking guy, in the past I have taken a network approach to getting my containers connected to the internet. I would configure a linux bridge (the front bridge) on the host, and then connect the Containers and the Host to that bridge. Like this:
This method works quite well, allowing your router to provide addresses to your containers, and thus Internet connectivity. However, it is tricky to setup, and there is a risk of cutting off network access to the host when moving the host connection from the ethernet port to the Linux Bridge.
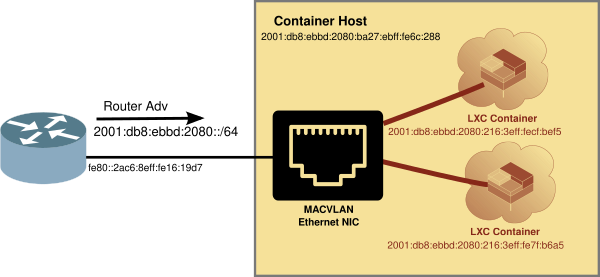
Using MACVLAN interface
There is an easier way, which doesn’t require the setting up of the front bridge or moving the host network connection. It is using the MACVLAN network attachment.
The MACVLAN technique uses the features of modern network interfaces (NICs) that support virtual interfaces. With virtual interface support, a single NIC can support not only multiple IP addresses, but several MAC (Media Access Control) addresses as well.
[Network Diagram with MACVLAN]
Creating LXD Profile for MACVLAN
LXD Containers use a profile to determine which resources to attach to, such as hard disk or network. The default LXD proflie looks like:
$ lxc profile show default
config: {}
description: Default LXD profile
devices:
  eth0:
    name: eth0
    network: lxdbr0
    type: nic
  root:
    path: /
    pool: default
    type: disk
name: default
used_by: []
In the eth0 section, you can see that by default, the container will attach to the LXD linux bridge it sets up at init time, called lxdbr0. Unfortunately, that is a bridge to no where.
So we’ll create another profile that connects to the Host NIC via MACVLAN. First copy the default, and then change a couple of lines, specifically the nictype and the parent. The parent is the name of the host ethernet device. On a Raspberry Pi running Pi OS, it is eth0.
Now that you have a MACVLAN profile, using it is as simple as launching a new container with the -p macvlan option. For example, firing up a Container running Alpine OS:
$ lxc launch -p macvlan images:alpine/3.16 test
Creating test
Starting test
$
Looking at the container running with the lxc ls command:
$ lxc ls
+---------+---------+------------------------+-----------------------------------------------+-----------+-----------+
|  NAME   |  STATE  |          IPV4          |                     IPV6                      |   TYPE    | SNAPSHOTS |
+---------+---------+------------------------+-----------------------------------------------+-----------+-----------+
| test    | RUNNING | 192.168.215.129 (eth0) | fd73:c73c:444:0:216:3eff:fe65:2b99 (eth0)     | CONTAINER | 0         |
|         |         |                        | 2001:db8:8011:fd44:216:3eff:fe65:2b99 (eth0)  |           |           |
+---------+---------+------------------------+-----------------------------------------------+-----------+-----------+
And you can see that the new container already had IPv4 and IPv6 addresses (from my router). Let’s try a ping from inside the container.
Checking connectivity from inside the MACVLAN attached Container
We’ll step inside the container with the lxc exec command, and ping via IPv6 and IPv4.
$ lxc exec test sh

~ # ping -c 3 he.net
PING he.net (2001:470:0:503::2): 56 data bytes
64 bytes from 2001:470:0:503::2: seq=0 ttl=56 time=34.192 ms
64 bytes from 2001:470:0:503::2: seq=1 ttl=56 time=33.554 ms
64 bytes from 2001:470:0:503::2: seq=2 ttl=56 time=33.959 ms

--- he.net ping statistics ---
3 packets transmitted, 3 packets received, 0% packet loss
round-trip min/avg/max = 33.554/33.901/34.192 ms

~ # ping -c 3 1.1.1.1
PING 1.1.1.1 (1.1.1.1): 56 data bytes
64 bytes from 1.1.1.1: seq=0 ttl=59 time=11.835 ms
64 bytes from 1.1.1.1: seq=1 ttl=59 time=11.933 ms
64 bytes from 1.1.1.1: seq=2 ttl=59 time=11.888 ms

--- 1.1.1.1 ping statistics ---
3 packets transmitted, 3 packets received, 0% packet loss
round-trip min/avg/max = 11.835/11.885/11.933 ms
~ #
As you can see we can get out to the internet without all the fuss of the old way of setting up a front bridge.
Is there a downside to using MACVLAN?
With it being so easy to connect to your LAN using MACVLAN, are there any downsides?
A key limitation of using MACVLAN is that one must use an Ethernet NIC. Or to put it another way, you can’t use Wifi when using a MACVLAN interface. This is because the MACVLAN interface is a virtual interface, and creates additional MAC addresses for each container.
In a managed Wifi network (which 99% are), the Access Point (AP) will only talk to the MAC address of the client which registered with the AP. A MACVLAN will try to use additional MAC addresses which will be rejected by the AP (since those addresses are not registered with the AP.
That doesn’t mean that you couldn’t try to set up a Wireless Bridge with Wireless Distribution System (WDS), but that is beyond the scope of this article. For now, think of MACVLAN as only using your Ethernet NIC.
OK, but can the Container talk to the LXD Host?
The short answer is NO. But there is a work-around. Because the Containers are talking on a virtual interface of the NIC, and the host is on the physical interface, it doesn’t see the traffic. However, if one adds an additional MACLAN interface on the Host, the Container will be able to communicate with the Host.
Fortunately, there is a script to automagically create a MACVLAN interface on the LXD Host. This script is called: lxd_add_macvlan_host.sh.
The script does not make any permanent changes to the host, but rather configures the MACVLAN interface on the fly. If you want this to be permanent, then invoke the script from /etc/rc.local (you may have to enable rc.local if you are using systemd).
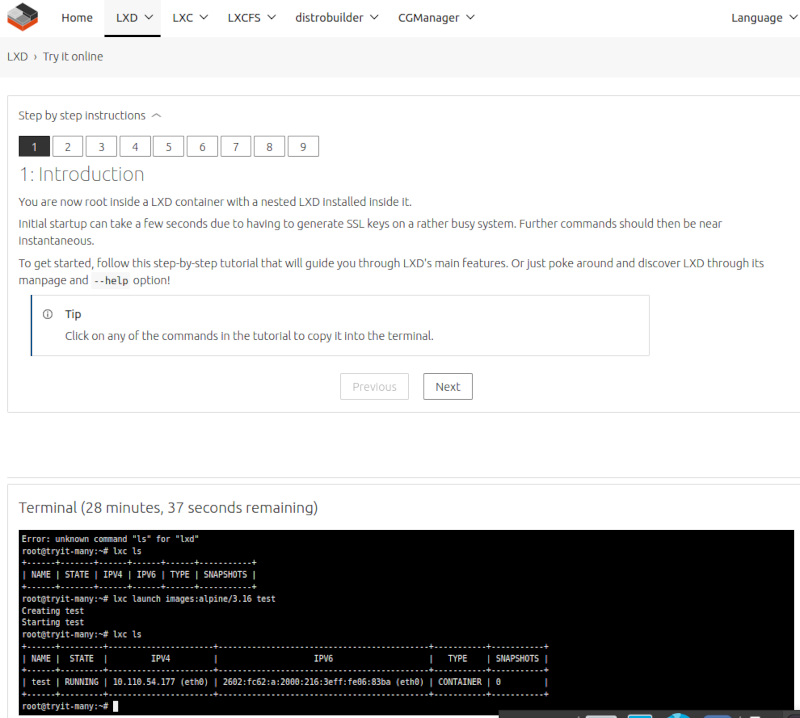
Using LXD without installing it first
Fortunately, if you want to learn about Linux Containers before doing an actual install, Ubuntu has setup a cloud service, where you can try LXD online. The session is limited to 30 minutes, but it is free.
The linux containers have real-routable IPv6 addresses, which can be accessed from the internet.
$ ping 2602:fc62:a:2000:216:3eff:fe06:83ba -c3
PING 2602:fc62:a:2000:216:3eff:fe06:83ba(2602:fc62:a:2000:216:3eff:fe06:83ba) 56 data bytes
64 bytes from 2602:fc62:a:2000:216:3eff:fe06:83ba: icmp_seq=1 ttl=50 time=73.8 ms
64 bytes from 2602:fc62:a:2000:216:3eff:fe06:83ba: icmp_seq=2 ttl=50 time=70.8 ms
64 bytes from 2602:fc62:a:2000:216:3eff:fe06:83ba: icmp_seq=3 ttl=50 time=70.8 ms

--- 2602:fc62:a:2000:216:3eff:fe06:83ba ping statistics ---
3 packets transmitted, 3 received, 0% packet loss, time 2004ms
rtt min/avg/max/mdev = 70.764/71.777/73.790/1.423 ms
It is designed to allow you to get familiar with LXD, but you can actually run services (for 30 minutes) such as a web server or even manage LXD using LXDware over IPv6!
Using LXD on a Pi
Of course, LXD runs on more powerful machines than just Raspberry Pi’s. But you can enjoy the advantages of Linux Containers in your own home by installing it on a Pi. Using MACVLAN interfaces means it just got simpler to install and use Linux Containers.
While we are still a few years off from turning off IPv4 on the internet, it is possible to turn off IPv4 in your SOHO (Small Office Home Office) network. Or turn it off on one of your SOHO networks. Google is showing over 40% of connections to the Internet Search Engine are over IPv6. By running an IPv6-only network in the SOHO, you will:
Find out what breaks with IPv4 disabled
Simplify your firewall rules, since only IPv6 is supported
Discover how well most of the Internet works using DNS64/NAT64
I have been running an IPv6-only network in my house for a couple of years now, and it works amazingly well. There are items, such as my Internet Radio which do not work over IPv6, and I have a Dual Stack DMZ for IoT-like devices like that. But the major OSs (Windows, Mac, Linux, iOS, Android) all do IPv6 quite well these days.
Getting from here to there
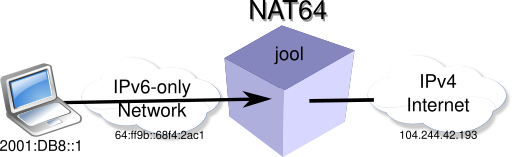
The key to running IPv6-only, and still browsing the other 59% of the Internet is using a transition technology, DNS64/NAT64. This has two parts, a special DNS (Domain Name Server) which will synthesize IPv6 addresses (AAAA records) when a DNS request returns only an A record (IPv4-only).
Once your laptop has a synthesized IPv6 address, it will connect to the NAT64 (Net Address Translation v6 to v4) which will do the work of translating the synthesized IPv6 address to a real IPv4 address and send the packet out on the Internet.
Using OpenWrt for DNS64/NAT64
Fortunately, you can take any of the thousand or so routers supported by OpenWrt, and run both DNS64 and NAT64. OpenWrt is an actively developed open source project for SOHO routers.
Forgunately, DNS64 and NAT64 can run on the same OpenWrt router.
DNS64
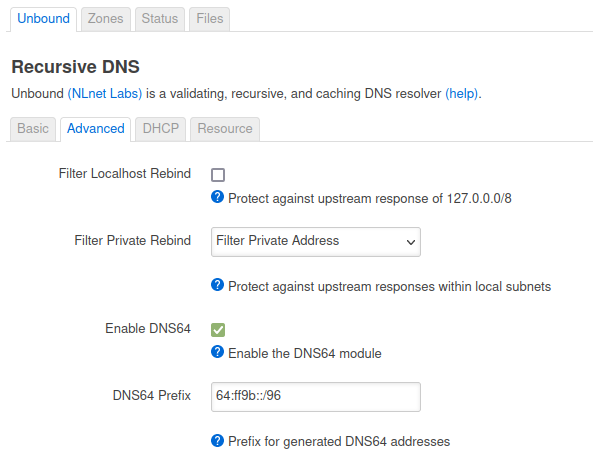
OpenWrt uses DNSMasq as a DNS/DHCPv4 server by default. Since we’ll be running IPv6-only, we won’t need the DHCPv4 server. I have disabled DNSMasq and installed unbound DNS server. Specifically because it has a checkbox that enables DNS64, making it the easiest DNS64 installation you will ever do.
Just click on the Enable DNS64 checkbox, and you are running a DNS64 server
Unbound’s DNS64 uses the well known prefix (WKP) of 64:ff9b::/96 by default, but can be changed to any IPv6-prefix in your network.
NAT64
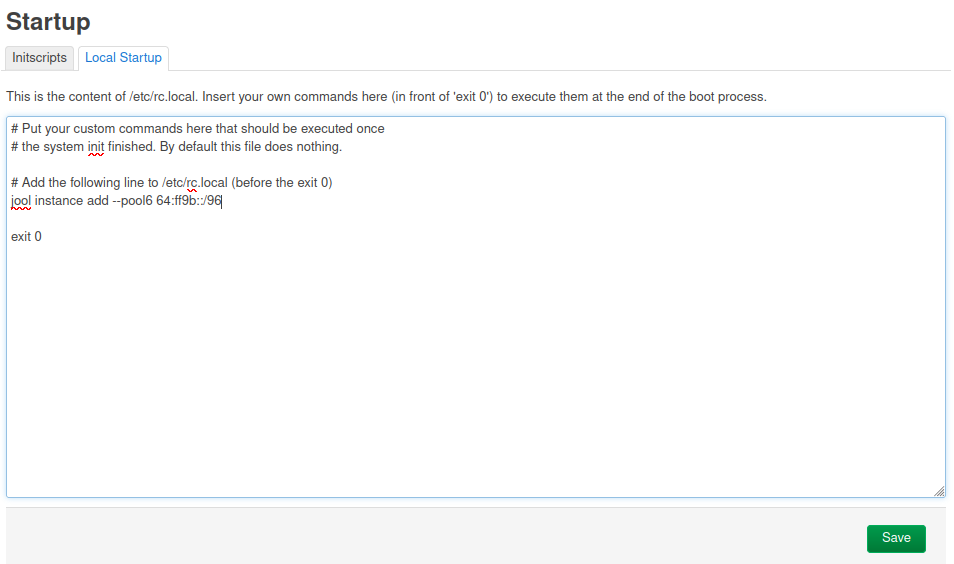
NAT64 on OpenWrt uses a handy packet tool called jool. Jool can do many things but to get it configured for NAT64 requires the command line. ssh into the router install jool (on OpenWrt version 22.03)
You will most likely want this to be persistent across router reboots, therefore add the following to your /etc/rc.local file (before exit 0. This can be done using the web interface, Luci, under System->Startup->Local Startup
Testing IPv6-only
Now that you have DNS64 and NAT64 running on your OpenWrt router, connect a laptop, and try to ping an IPv4-only website, such as twitter.com or cira.ca (the Canadian Internet Registration Authority)
$ ping -c2 cira.ca
PING cira.ca(a39c698e40c082be1.awsglobalaccelerator.com (64:ff9b::321:b811)) 56 data bytes
64 bytes from a39c698e40c082be1.awsglobalaccelerator.com (64:ff9b::321:b811): icmp_seq=1 ttl=120 time=13.1 ms
64 bytes from a39c698e40c082be1.awsglobalaccelerator.com (64:ff9b::321:b811): icmp_seq=2 ttl=120 time=14.7 ms

--- cira.ca ping statistics ---
2 packets transmitted, 2 received, 0% packet loss, time 1002ms
rtt min/avg/max/mdev = 13.146/13.928/14.710/0.782 ms
Ping tests DNS64 to synthesize an IPv6 address (see the WKP 64:ff9b::/96 is being used above), and NAT64 to do the actual ping (icmp message).
Running IPv6-only
Running IPv6-only is a great way to check out what apps work (and what doesn’t work) on IPv6-only. A few notable apps that don’t work well on IPv6-only:
Zoom (Jitsi works just fine on IPv6-only)
Many VPN software/providers (Wireguard works well in IPv6-only)
That said it is amazing what does work well on IPv6-only. As a test, this past summer, I put our house guests on the IPv6-only network, and at the end of the week, I asked them if they had run into any problems. They replied they had no problems on the IPv6-only network during the week.
With the help of DNS64 and NAT64 on OpenWrt, you are now ready to run an IPv6-only network in your SOHO network, and see how the future of the Internet will work.
Notes:
as of 2022-10-24, jool will report (Xtables disabled)”, this is normal, as OpenWrt now uses netfilter
To be fair, www.cira.ca has an IPv6 address, but cira.ca does not
Be aware, that if you are a guest at my house, you will be put onto the IPv6-only network 😉
I have been thinking about the transition to IPv6 wrong. For some time I have seen IPv6-only as the natural progression from Dual-Stack. But that strategy doesn’t accommodate all the IPv4-only devices (such as IoT) which will be with us for years.
With the standardization of RFC 8925 IPv6-Only Preferred Option for DHCPv4, I see another phase in the transition to IPv6-only. The phase of mostly IPv6-only.
Mostly IPv6-only means that for a given subnet, most of the devices are capable of IPv6, and will use it. But the remaining small number of devices, such as badge readers, HVAC, and the like can still operate using just IPv4.
Signaling an IPv6-only option in IPv4 DHCP
Initially, this sounds counter-intuitive. After all, if a device is capable of IPv6-only, it won’t even need to make a DHCPv4 request, and therefore would not see the IPv6-only option.
However, that is looking at it from the IPv6 side. Looking at it from the IPv4 side, there are advantages to letting devices know that the IPv6-only mechanisms (Native/DNS64/NAT64) are in place. And therefore for those devices which are capable of IPv6-only, there is no need to use IPv4,
Reintroducing DHCPv4 Option 108
Back in the heyday of DHCP, there were many options being allocated for all sorts of useful things, such as: * Multicast Assignment through DHCP (was option 100) * IPX Compatibility (was option 110)
Option 108 was initially reserved for Swap Path, but was never standardized in a RFC.
RFC 8925 reintroduces Option 108 as IPv6-Only Preferred. IANA (Internet Assigned Numbering Authority) maintains a list of current DHCP Options.
How does DHCPv4 Option 108 work?
If the network supports IPv6-only, then the DHCPv4 server can be configured to include Option 108 in the DHCP offer to the client.
As you can see tshark (and tcpdump and wireshark) have not been updated for option 108 support yet.
Once the client, which supports Option 108 sees the option, it will stop the request process for an IPv4 address, and the device will become IPv6-only on your Mostly IPv6-only network. The DHCPv4 server will not allocate an IPv4 address, and there will be no lease for an address.
If the device does not support Option 108, it will ignore it, and continue to request an IPv4 address, and operate using IPv4 in your Mostly IPv6-only network.
Advantage of using Option 108
In addition to signaling to the devices which can run IPv6-only, the use of Option 108 reduces the burden for IPv4 addresses.
In a Dual-Stack network, all devices will have an IPv4 address. In a Mostly IPv6-only network, only the devices which can not operate in an IPv6-only environment will consume an IPv4 address.
As device software is upgraded, and perhaps will support IPv6-only, the usage of IPv4 addresses should decline.
Support for Option 108 in use today
There are operating systems which support Option 108 today, quite possibly in your network.
iOS 15 (iPhones)
MacOS 12.0.1 (Macs)
Windows (Not yet)
Sadly, Linux long used as the test bed for the internet does not support Option 108 (as of systemd v251. A feature request has been submitted.
Setting up Option 108 in your network using OpenWrt
Before setting up Option 108, ensure you have DNS64/NAT64 setup to support IPv6-only operation, as nodes responding to the option will become IPv6-only. See this post for info on how to configure OpenWrt for DNS64/NAT64 (ipv6hawaii.org)
Although OpenWrt does not directly support Option 108, it is possible to configure it from the web interface (LuCI).
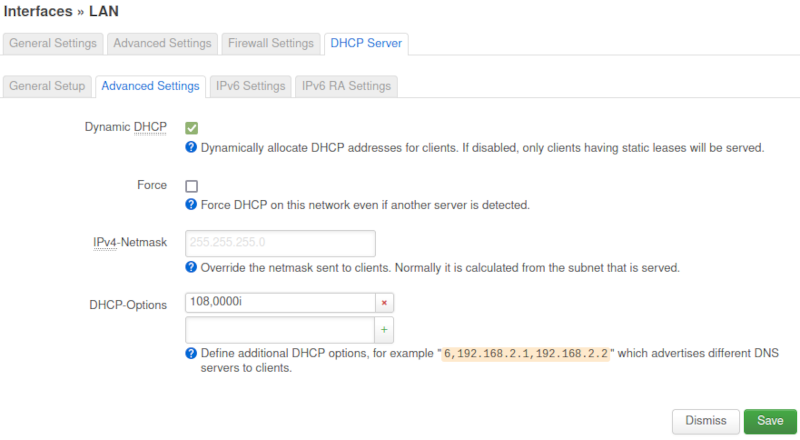
After logging into the web interface, go to Network->Interfaces->LAN (Edit)->DHCP Server->Advanced Settings:
In the DHCP Options enter the string 108,0000i. The letter i is required to make option 108 a 4 byte value (which the RFC requires). Click Save and then Save & Apply
Or, if you prefer, you can edit the dhcp config file /etc/config/dhcp and add the line in the lan stanza:
config dhcp 'lan'
    option interface 'lan'
    ...
    list dhcp_option '108,0000i'
And restart networking:
/etc/init.d/network restart
Mostly IPv6-only is a good thing
RFC 8925 provides a mechanism that brings us one step closer to an IPv6-only world, while still providing connectivity to the devices which do not yet support IPv6.
While I see this extending the long tail of IPv4, and I would like to see everything IPv6-only, the real goal should be connectivity for all devices on your network. Option 108 helps us get there.
Notes:
Thanks to the Dnsmasq author for his quick response in how to force a 4 byte value for Option 108.
It has been a long time coming, but Netfilter have finally arrived in the latest release of OpenWrt (22.03.x). Netfilter brings network parity for IPv6, while improving firewall performance.
The Early Days
A little history, Linux has always had the concept of packet filtering, or a firewall. The original packet filter, ipfw, integrated into Linux in 1994, was based on a BSD ipfirewall. In Linux version 2.2 (1999), ipchains was introduced, but was stateless only. The Linux firewall evolved again with iptables in version 2.4 (2001), where stateful inspection returned.
iptables continued to evolve, but with separate streams, one for IPv4, another for IPv6, and yet another for the Ethernet (ebtables). Having multiple tables impacted performance, and led to kernel code duplication.
NFT
Netfilter‘s new packet-filtering utility, nft, replaces the older tools: iptables, ip6tables, arptables and ebtables.
At first look, nft options look quite a bit different from the old iptables.
nft --help
Usage: nft [ options ] [ cmds... ]

Options (general):
  -h, --help                      Show this help
  -v, --version                   Show version information
  -V                              Show extended version information

Options (ruleset input handling):
  -f, --file <filename>           Read input from <filename>
  -D, --define <name=value>       Define variable, e.g. --define foo=1.2.3.4
  -i, --interactive               Read input from interactive CLI
  -I, --includepath <directory>   Add <directory> to the paths searched for include files. Default is: /etc
  -c, --check                     Check commands validity without actually applying the changes.
  -o, --optimize                  Optimize ruleset

Options (ruleset list formatting):
  -a, --handle                    Output rule handle.
  -s, --stateless                 Omit stateful information of ruleset.
  -t, --terse                     Omit contents of sets.
  -S, --service                   Translate ports to service names as described in /etc/services.
  -N, --reversedns                Translate IP addresses to names.
  -u, --guid                      Print UID/GID as defined in /etc/passwd and /etc/group.
  -n, --numeric                   Print fully numerical output.
  -y, --numeric-priority          Print chain priority numerically.
  -p, --numeric-protocol          Print layer 4 protocols numerically.
  -T, --numeric-time              Print time values numerically.
A key difference is that nft wants to read a json-like formatted file of rules, rather than just a simple (sometimes not so simple) command line of iptables.
The first useful command is to show the tables defined (on OpenWrt). Netfilter has a new address family, inet which applies to IPv4 and IPv6.
# nft list tables
table inet fw4
Unfortunately, for the new-comer, that doesn’t appear to tell us much. But in fact, it is stating that there is a table of the family type of inet with the name fw4. A more informative command shows the chains and rules in the table (fw4):
# nft list table inet fw4
table inet fw4 {
    chain input {
        type filter hook input priority filter; policy accept;
        iifname "lo" accept comment "!fw4: Accept traffic from loopback"
        ct state established,related accept comment "!fw4: Allow inbound established and related flows"
        tcp flags syn / fin,syn,rst,ack jump syn_flood comment "!fw4: Rate limit TCP syn packets"
        iifname "br-lan" jump input_lan comment "!fw4: Handle lan IPv4/IPv6 input traffic"
        iifname "wan" jump input_wan comment "!fw4: Handle wan IPv4/IPv6 input traffic"
    }

    chain forward {
        type filter hook forward priority filter; policy drop;
        ct state established,related accept comment "!fw4: Allow forwarded established and related flows"
        iifname "br-lan" jump forward_lan comment "!fw4: Handle lan IPv4/IPv6 forward traffic"
        iifname "wan" jump forward_wan comment "!fw4: Handle wan IPv4/IPv6 forward traffic"
        jump handle_reject
    }

    chain output {
        type filter hook output priority filter; policy accept;
        oifname "lo" accept comment "!fw4: Accept traffic towards loopback"
        ct state established,related accept comment "!fw4: Allow outbound established and related flows"
        oifname "br-lan" jump output_lan comment "!fw4: Handle lan IPv4/IPv6 output traffic"
        oifname "wan" jump output_wan comment "!fw4: Handle wan IPv4/IPv6 output traffic"
    }

...

    chain forward_wan {
        icmpv6 type { destination-unreachable, time-exceeded, echo-request, echo-reply } limit rate 1000/second counter packets 4 bytes 416 accept comment "!fw4: Allow-ICMPv6-Forward"
        icmpv6 type . icmpv6 code { packet-too-big . no-route, parameter-problem . no-route, parameter-problem . admin-prohibited } limit rate 1000/second counter packets 0 bytes 0 accept comment "!fw4: Allow-ICMPv6-Forward"
        meta l4proto esp counter packets 0 bytes 0 jump accept_to_lan comment "!fw4: Allow-IPSec-ESP"
        udp dport 500 counter packets 0 bytes 0 jump accept_to_lan comment "!fw4: Allow-ISAKMP"
        meta nfproto ipv6 tcp dport { 22, 80, 443 } counter packets 1 bytes 80 jump accept_to_lan comment "!fw4: ext_mgmt_fwd"
        meta nfproto ipv6 udp dport { 22, 80, 443 } counter packets 0 bytes 0 jump accept_to_lan comment "!fw4: ext_mgmt_fwd"
        jump reject_to_wan
    }

...
    chain mangle_forward {
        type filter hook forward priority mangle; policy accept;
        iifname "wan" tcp flags syn tcp option maxseg size set rt mtu comment "!fw4: Zone wan IPv4/IPv6 ingress MTU fixing"
        oifname "wan" tcp flags syn tcp option maxseg size set rt mtu comment "!fw4: Zone wan IPv4/IPv6 egress MTU fixing"
    }
}
As you can see there are IPv4 and IPv6 rules in the Netfilter table. The nftman page is long but full of good info.
Firewall abstraction of OpenWrt
Fortunately, the developers of OpenWrt have kept the familiar web interface (LuCI) for firewall configuration, and the user doesn’t have to know that nft is now managing everything, rather than the older tools: iptables, ip6tables, arptables and ebtables.
Conclusion
Why Netfilter? It reduces kernel code duplication, has more efficient execution, thus better performance, and adds atomic changes to filter rules.
Why OpenWrt? With the recent advent of malware targeting Small Office, Home Office [SOHO] routers, such as ZuoRAT, it is good to see an alternative to that old OEM router software, in a project which is active, and responding to security vulnerabilities.
nft has been around since 2014. Finally with the Netfilter address family of inet, IPv6 has equal status with IPv4. And with OpenWrt (22.03.x), your SOHO router will take advantage of a 21st Century firewall.
 With world-wide IPv6 usage, as measured by Google, at around 45%, questions arise, how do we push it higher? What is left to be done?
 With
With 

 For years I have been using a third party ISP for my IPv6-enabled internet. Alas, third party ISPs rely on last mile incumbent carriers to connect to their customers. It all works well, until it doesn’t. This fall, the last mile was disconnected from my ISP not once, but three times. After sitting in the Internet darkness for over a week, I decided to go with another ISP.

 I was recently traveling in Europe. My journey took me to Italy first, so I picked up a tourist SIM card for my phone with 50 GB of data (for a 30 day period), all for the low price of €45. I now had oodles of data, and could easily tether my laptop to my phone for internet access.